对应的教程视频:
高级篇Day5-01-MQ常见问题及消息可靠性_哔哩哔哩_bilibili
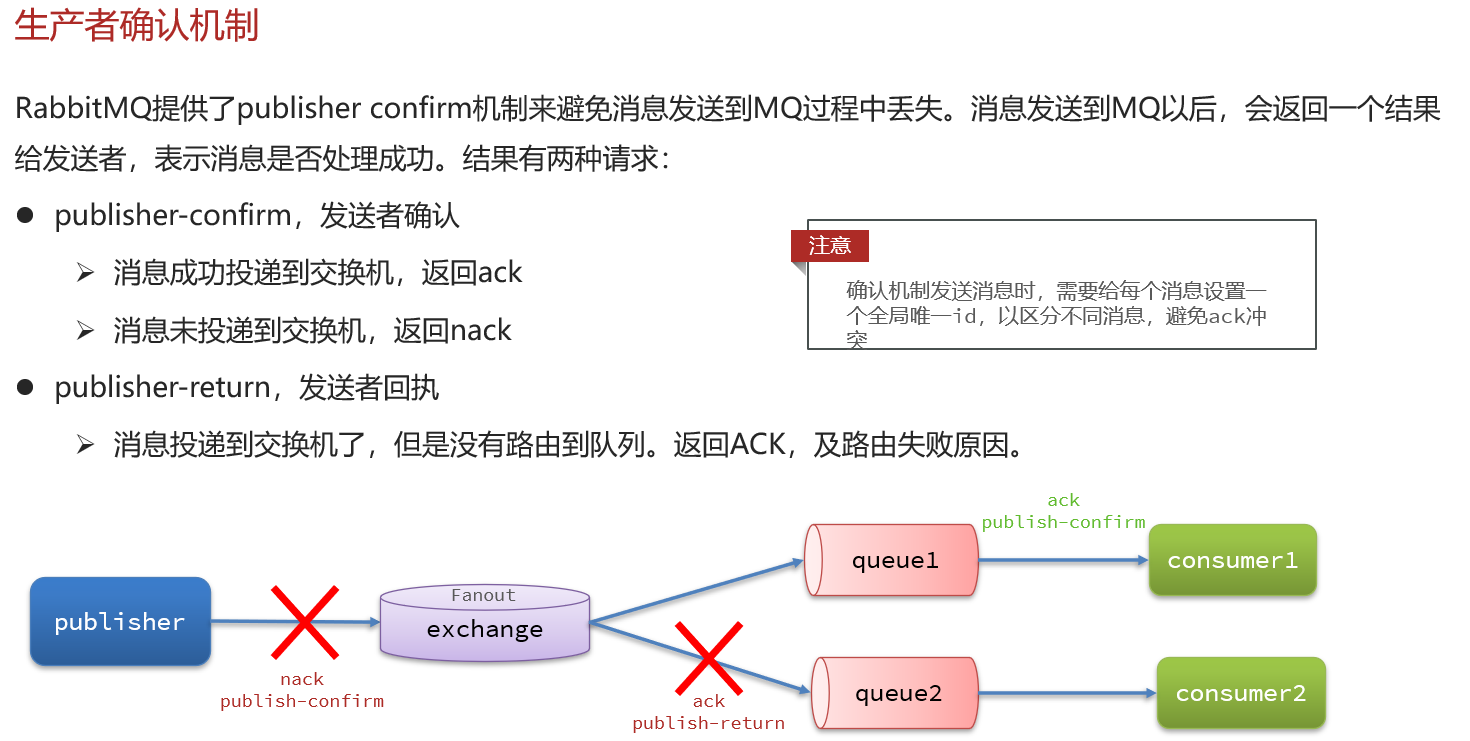
 一、生产者消息确认
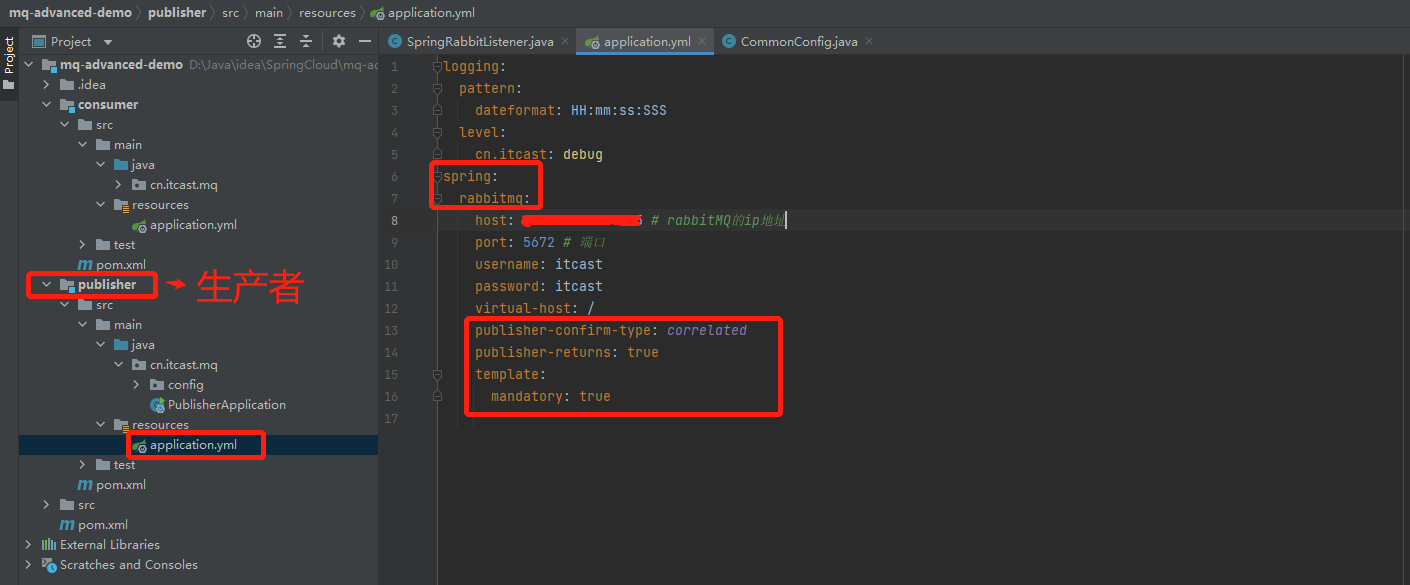
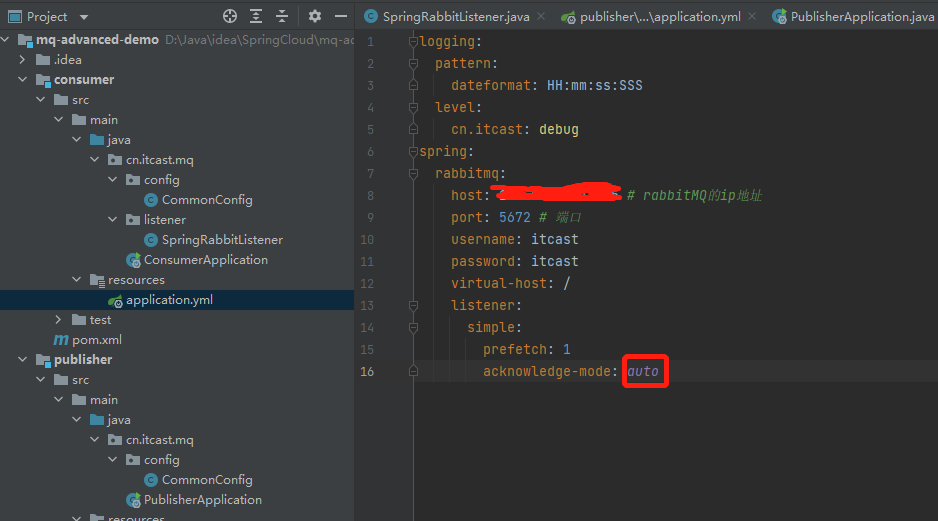
1.在生成者这个微服务的apllication.yml中添加配置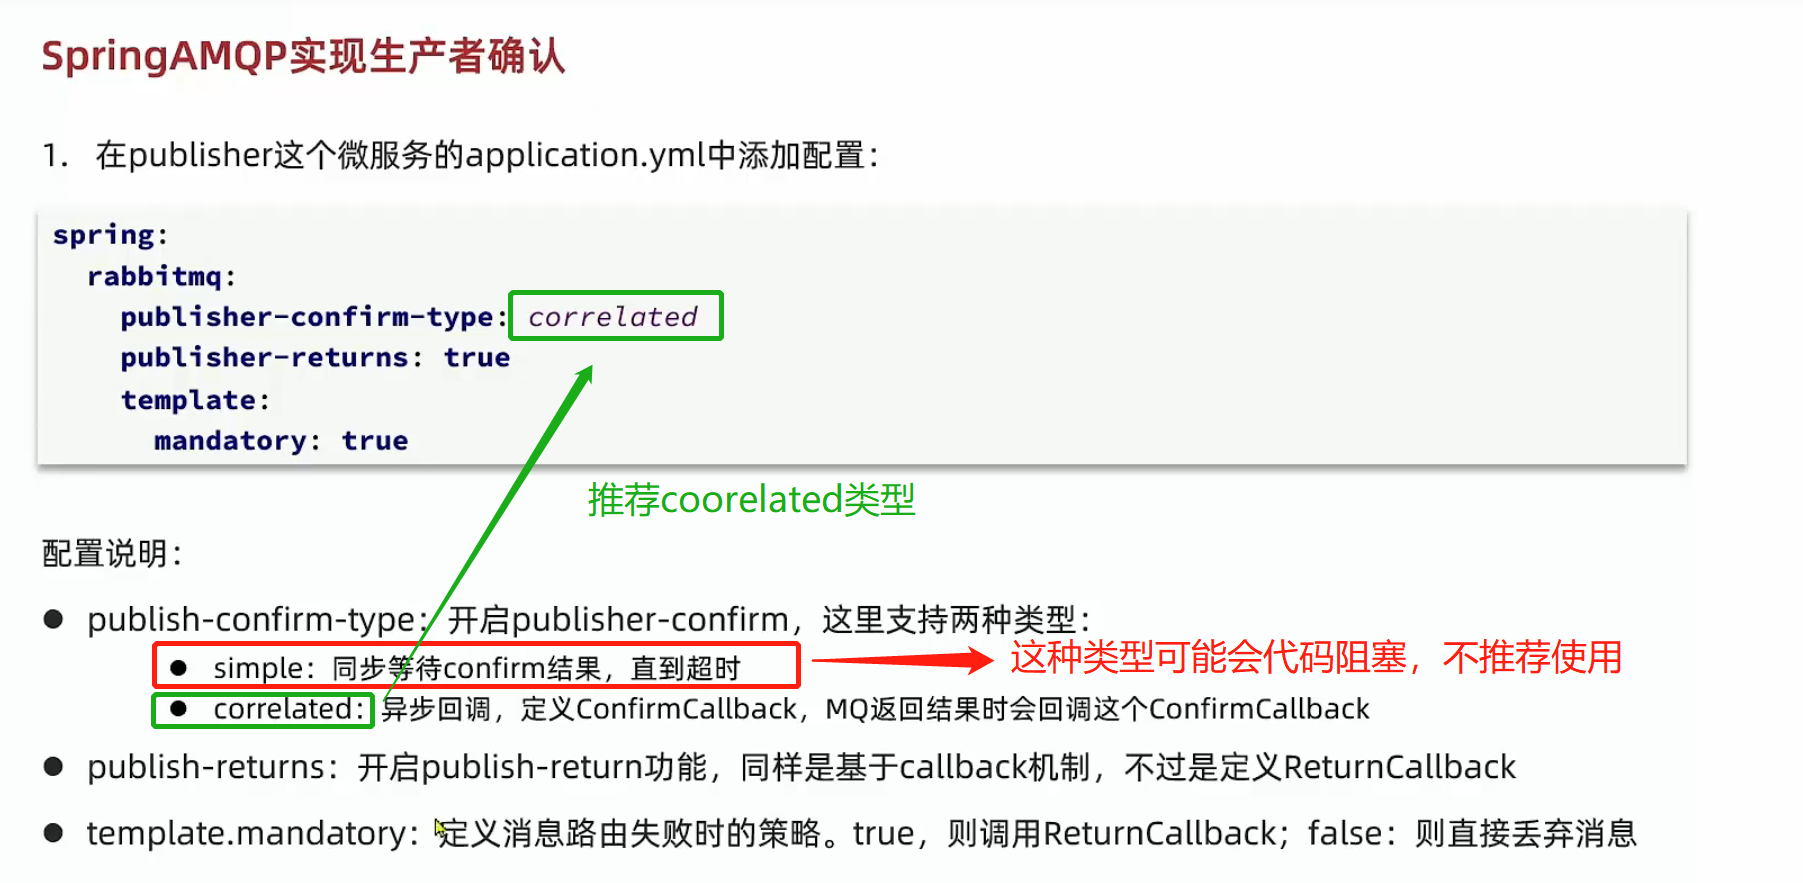
1
2
3
4
5
6
| spring:
rabbitmq:
publisher-confirm-type: correlated
publisher-returns: true
template:
mandatory: true
|
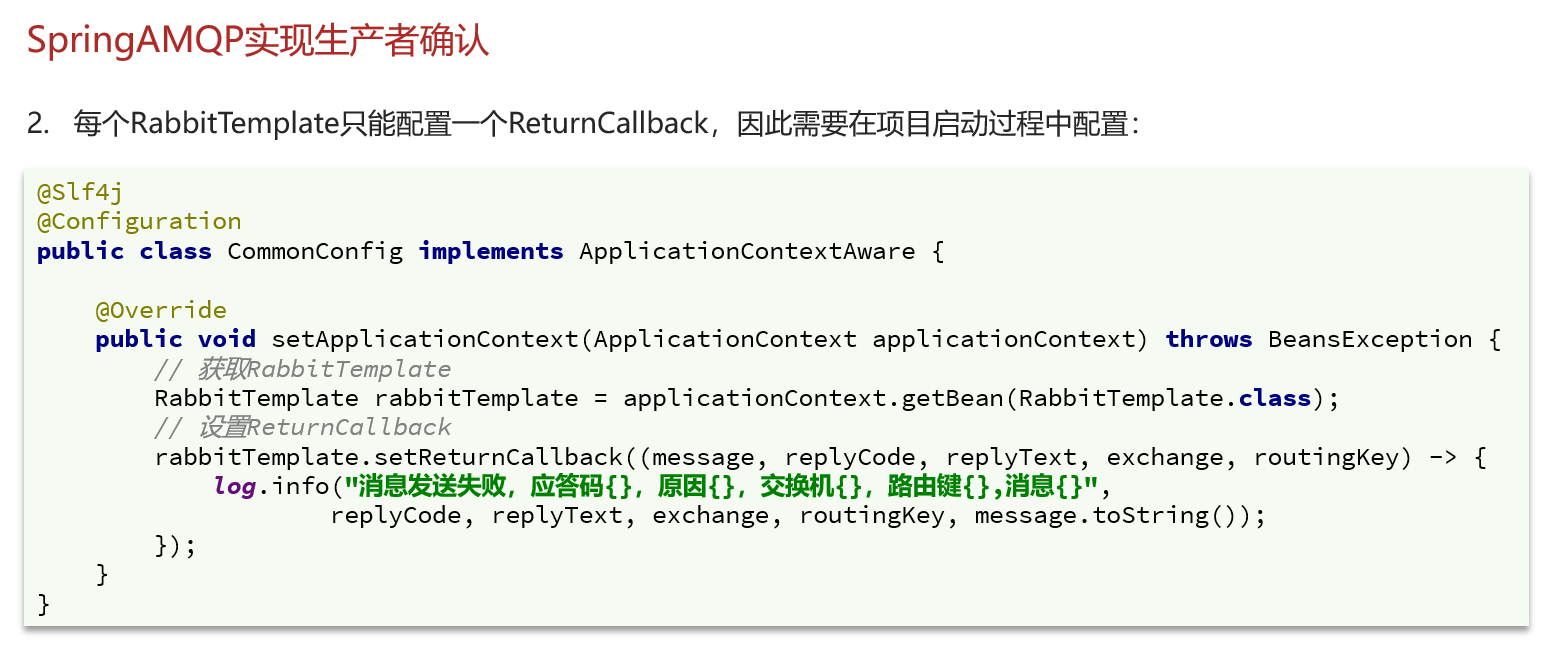
2.每个RabbitTemplate只能配置一个ReturnCallback,因此需要在项目启动过程中配置
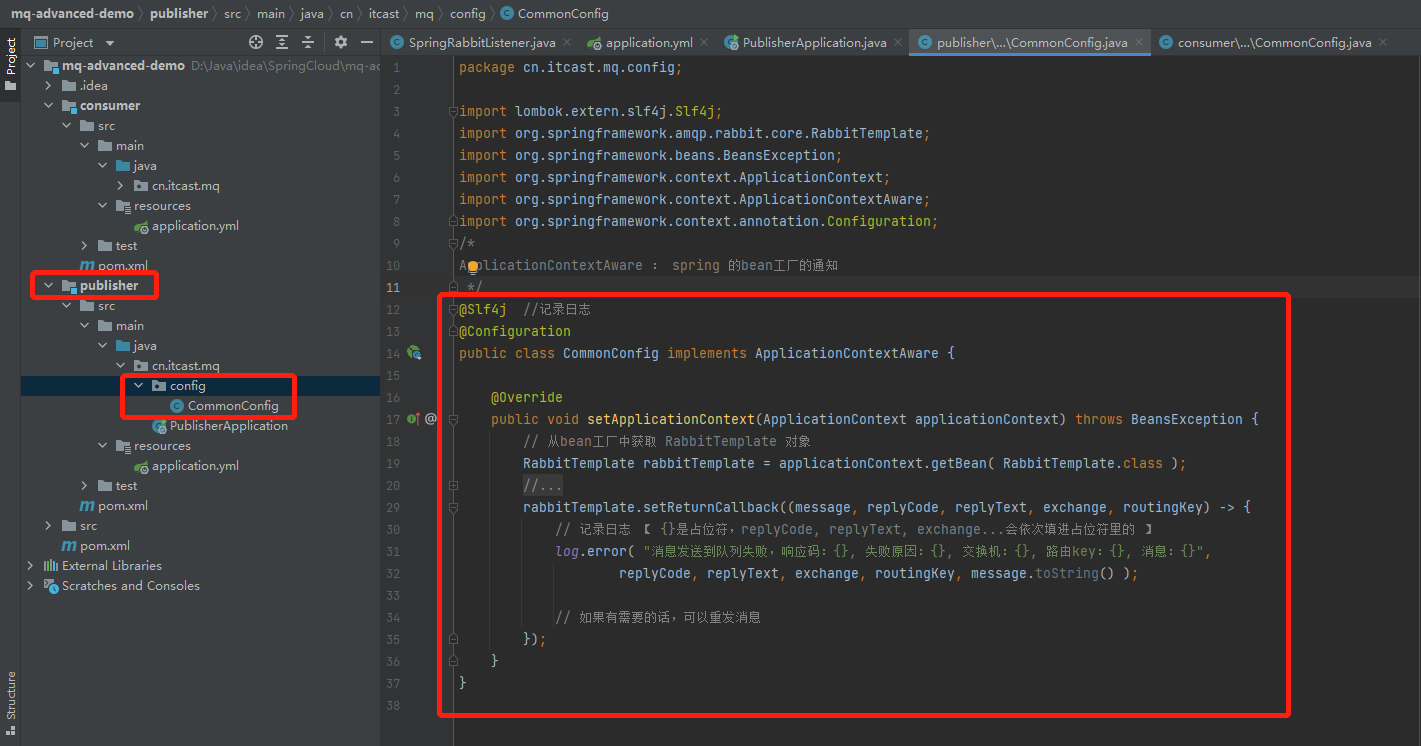
代码:
1
2
3
4
5
6
7
8
9
10
11
12
13
14
15
16
17
18
19
20
21
22
23
24
25
26
27
28
29
30
31
32
33
34
35
| import lombok.extern.slf4j.Slf4j;
import org.springframework.amqp.rabbit.core.RabbitTemplate;
import org.springframework.beans.BeansException;
import org.springframework.context.ApplicationContext;
import org.springframework.context.ApplicationContextAware;
import org.springframework.context.annotation.Configuration;
/*
ApplicationContextAware : spring 的bean工厂的通知
*/
@Slf4j //记录日志
@Configuration
public class CommonConfig implements ApplicationContextAware {
@Override
public void setApplicationContext(ApplicationContext applicationContext) throws BeansException {
// 从bean工厂中获取 RabbitTemplate 对象
RabbitTemplate rabbitTemplate = applicationContext.getBean( RabbitTemplate.class );
// 配置ReturnCallback
// rabbitTemplate.setReturnCallback(new RabbitTemplate.ReturnCallback() {
// // 像这种里面只有一个方法的,把鼠标方法 new 前面,会提醒 推荐用lambda表达式,快捷键 Alt + Enter
// @Override
// public void returnedMessage(Message message, int i, String s, String s1, String s2) {
//
// }
// });
// 像这种里面只有一个方法的,把鼠标方法 new 前面,会提醒 推荐用lambda表达式,快捷键 Alt + Enter
rabbitTemplate.setReturnCallback((message, replyCode, replyText, exchange, routingKey) -> {
// 记录日志 【 {}是占位符,replyCode, replyText, exchange...会依次填进占位符里的 】
log.error( "消息发送到队列失败,响应码:{}, 失败原因:{}, 交换机:{}, 路由key:{}, 消息:{}",
replyCode, replyText, exchange, routingKey, message.toString() );
// 如果有需要的话,可以重发消息
});
}
}
|
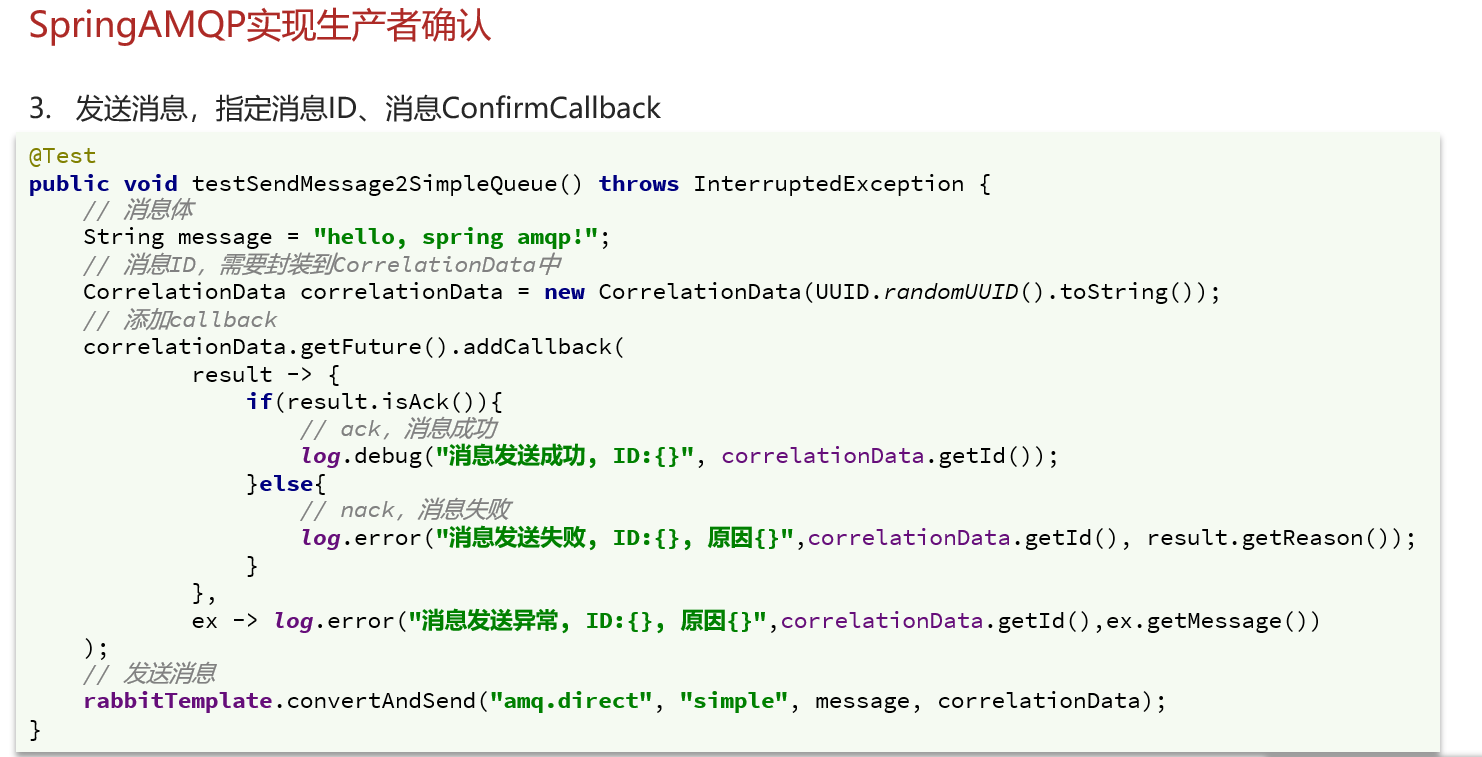
3.发送消息,指定消息ID、消息ConfirmCallback
代码:
1
2
3
4
5
6
7
8
9
10
11
12
13
14
15
16
17
18
19
20
21
22
23
24
25
26
27
28
29
30
31
32
33
34
35
36
37
38
39
40
41
42
43
44
45
46
47
48
49
| import lombok.extern.slf4j.Slf4j;
import org.junit.Test;
import org.junit.runner.RunWith;
import org.springframework.amqp.rabbit.connection.CorrelationData;
import org.springframework.amqp.rabbit.core.RabbitTemplate;
import org.springframework.beans.factory.annotation.Autowired;
import org.springframework.boot.test.context.SpringBootTest;
import org.springframework.test.context.junit4.SpringRunner;
import org.springframework.util.concurrent.FailureCallback;
import org.springframework.util.concurrent.SuccessCallback;
import java.util.UUID;
@Slf4j
@RunWith(SpringRunner.class)
@SpringBootTest
public class SpringAmqpTest {
@Autowired
private RabbitTemplate rabbitTemplate;
@Test
public void testSendMessage2SimpleQueue() throws InterruptedException {
// 1.准备消息
String message = "hello, spring amqp!";
// 2.准备CorrelationData
// 2.1.消息ID
CorrelationData correlationData = new CorrelationData( UUID.randomUUID().toString() );
// 2.2.准备ConfirmCallback
correlationData.getFuture().addCallback(result -> { //成功回调
// 判断结果
if( result.isAck() ) {
// ACK
log.debug( "消息成功投递到交换机!消息ID:{}", correlationData.getId() );
} else {
//NACK
log.error( "消息投递到交换机失败!消息ID:{}", correlationData.getId() );
// 重发消息
}
}, ex -> { //失败回调
//记录日志
log.error( "消息发送失败!", ex );
});
// 2.发送消息
rabbitTemplate.convertAndSend("amq.topic", "simple.text", message);
}
}
|
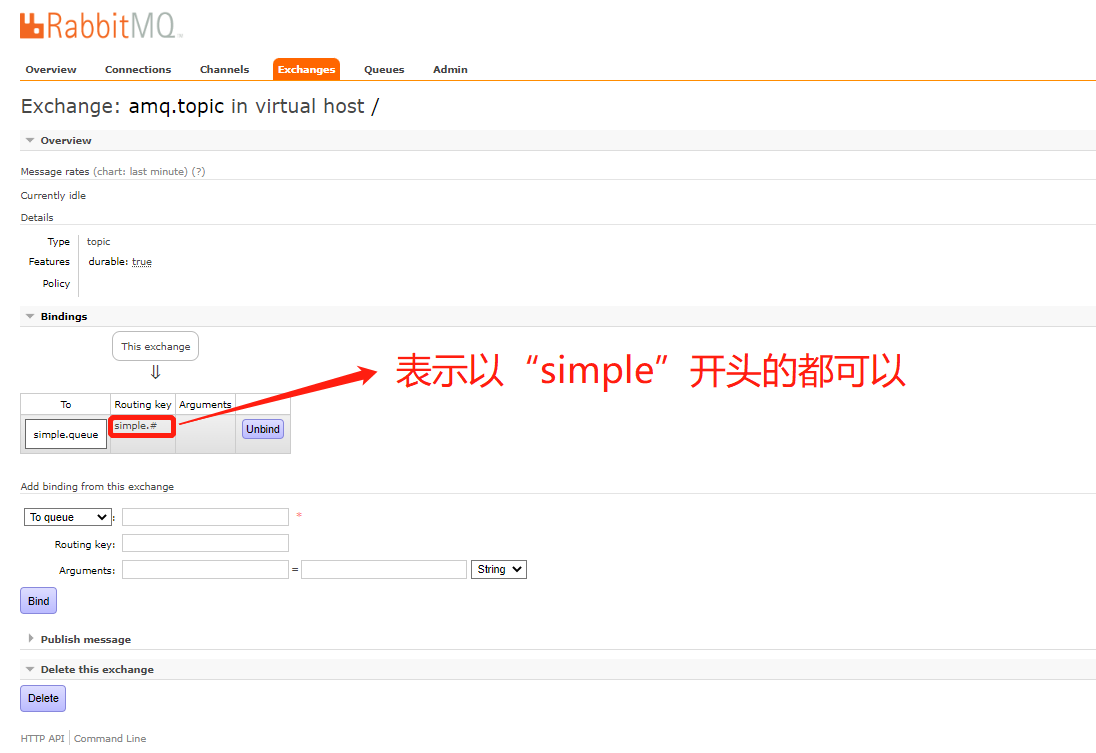
测试:
(给交换机添加绑定关系,这一步看情况做,如果绑定关系已经有的了的表不需要这一步)
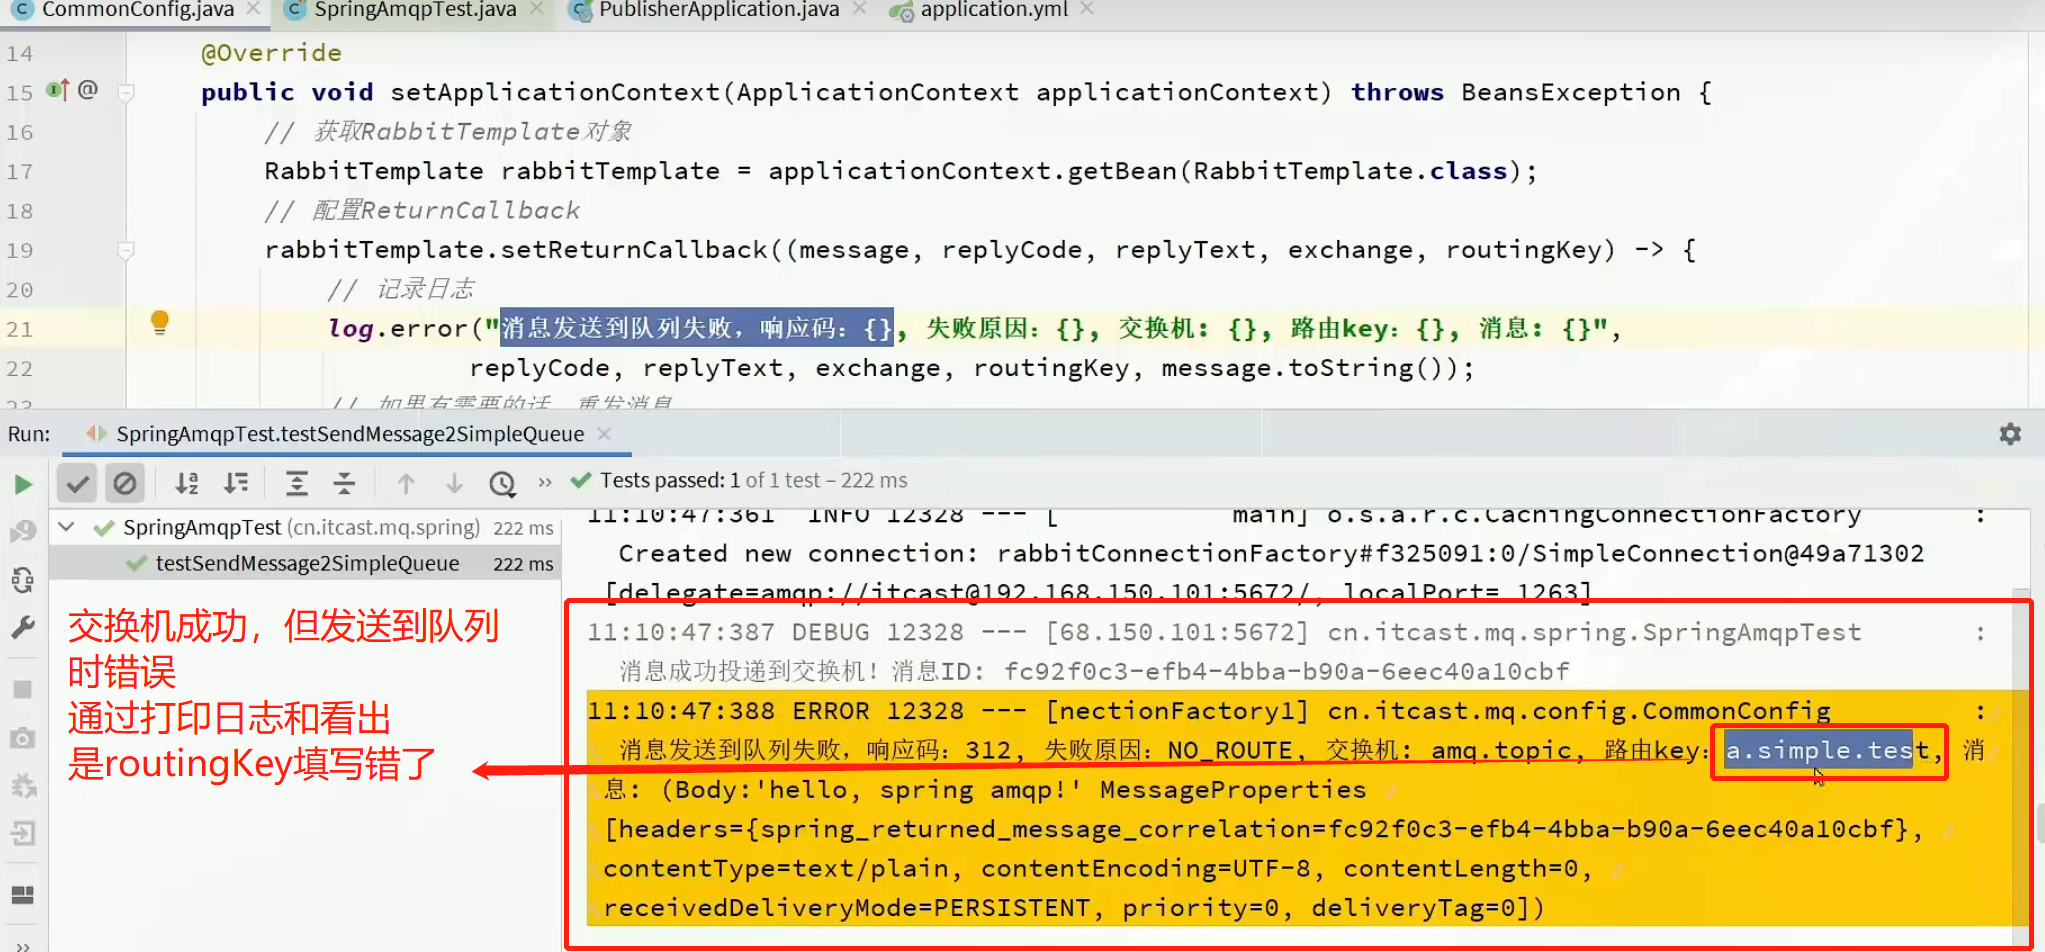
测试错误例子
4.总结
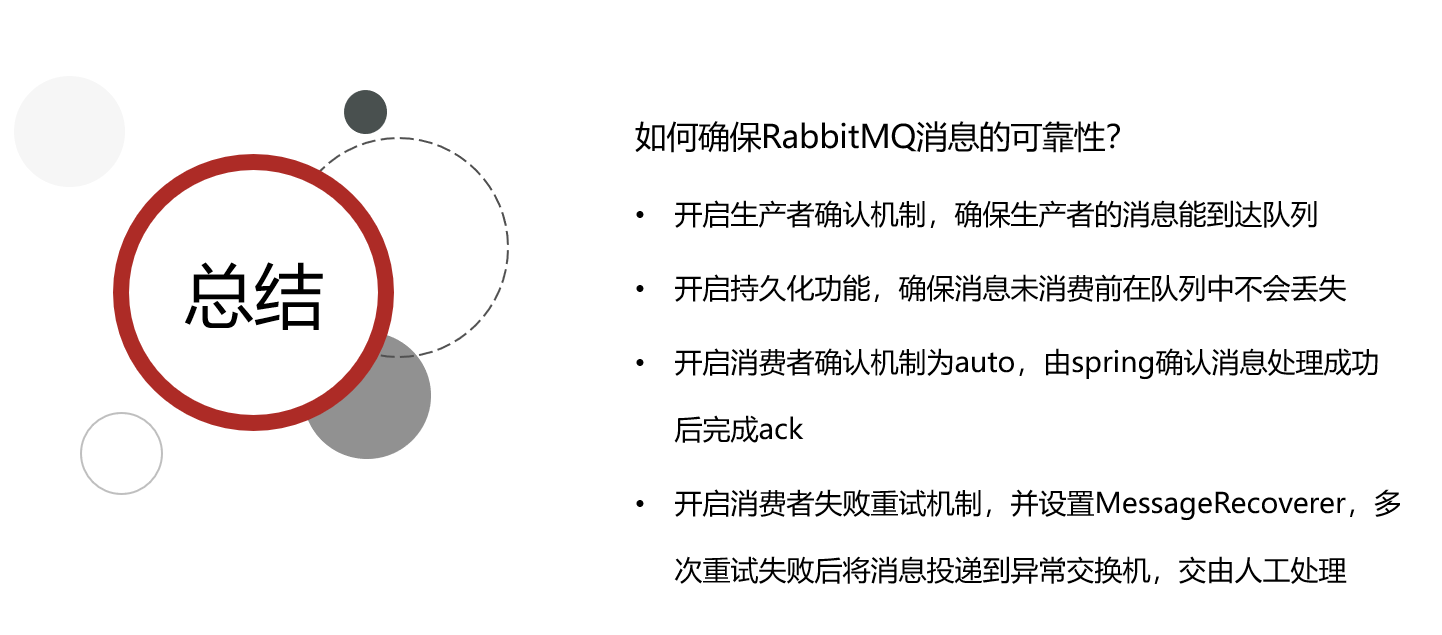
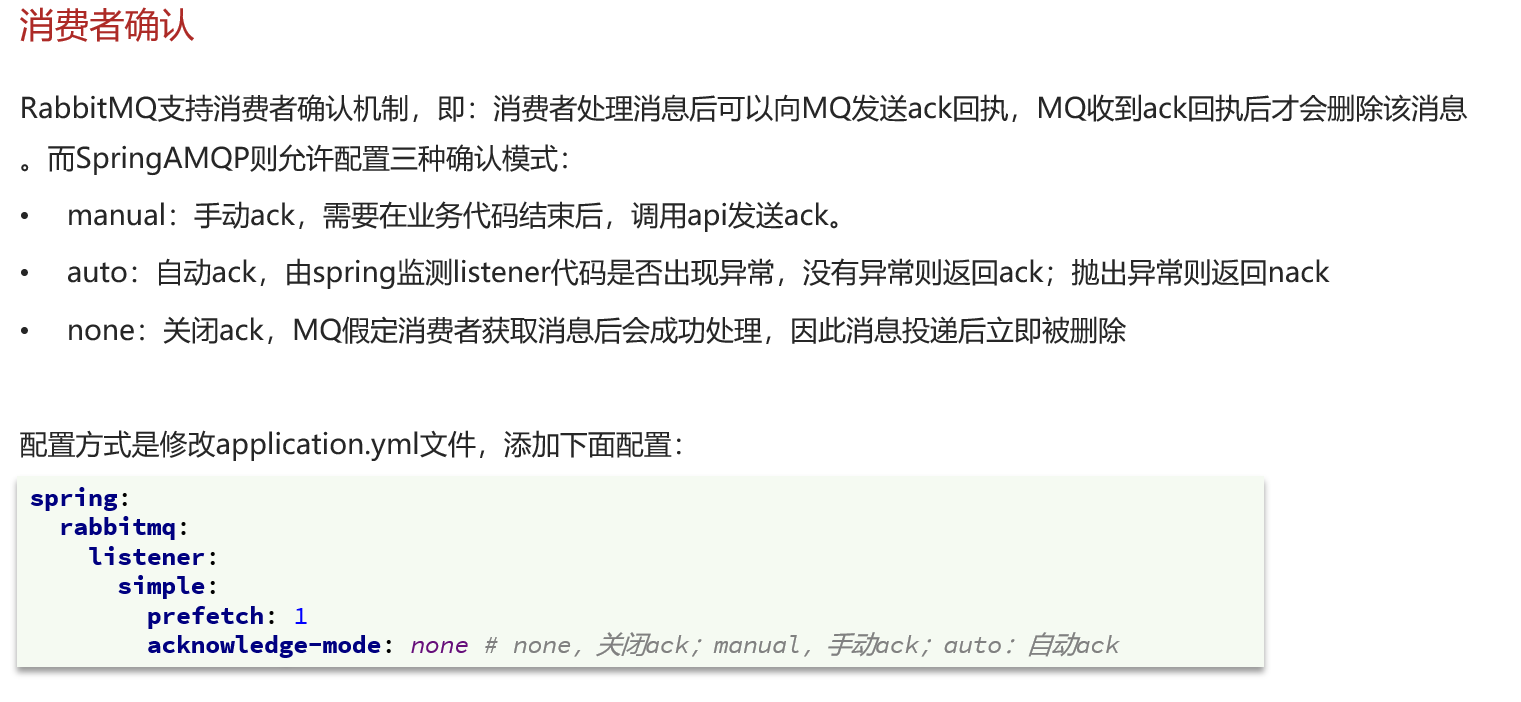
SpringAMQP中处理消息确认的几种情况:
publisher-comfirm:
• 消息成功发送到exchange,返回ack
• 消息发送失败,没有到达交换机,返回nack
• 消息发送过程中出现异常,没有收到回执
消息成功发送到exchange,但没有路由到queue,调用ReturnCallback
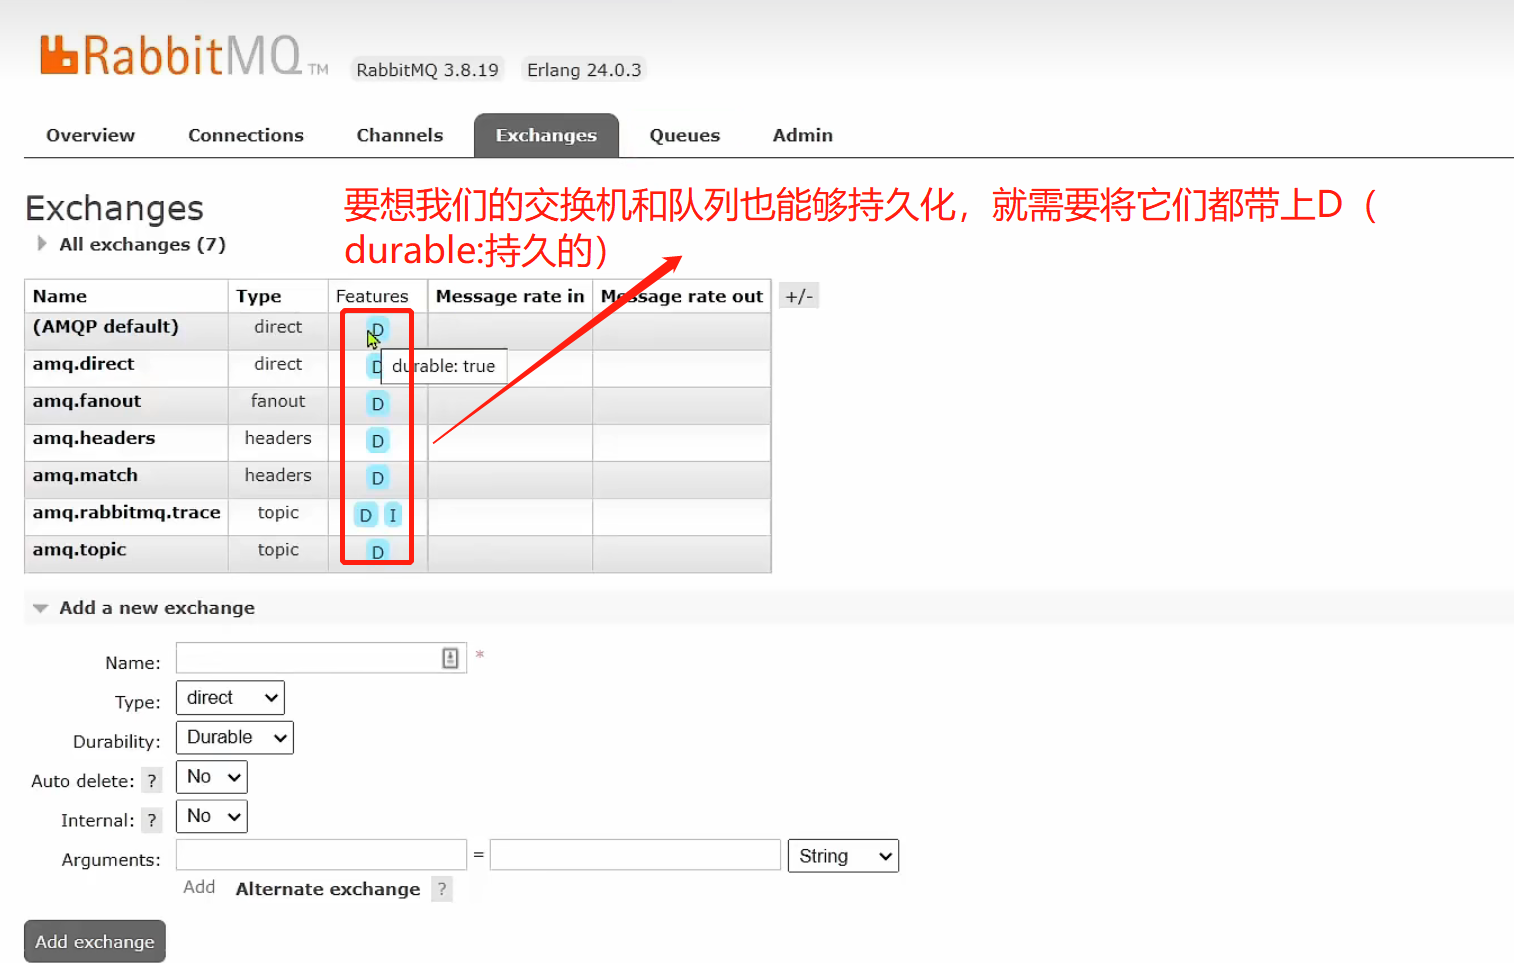
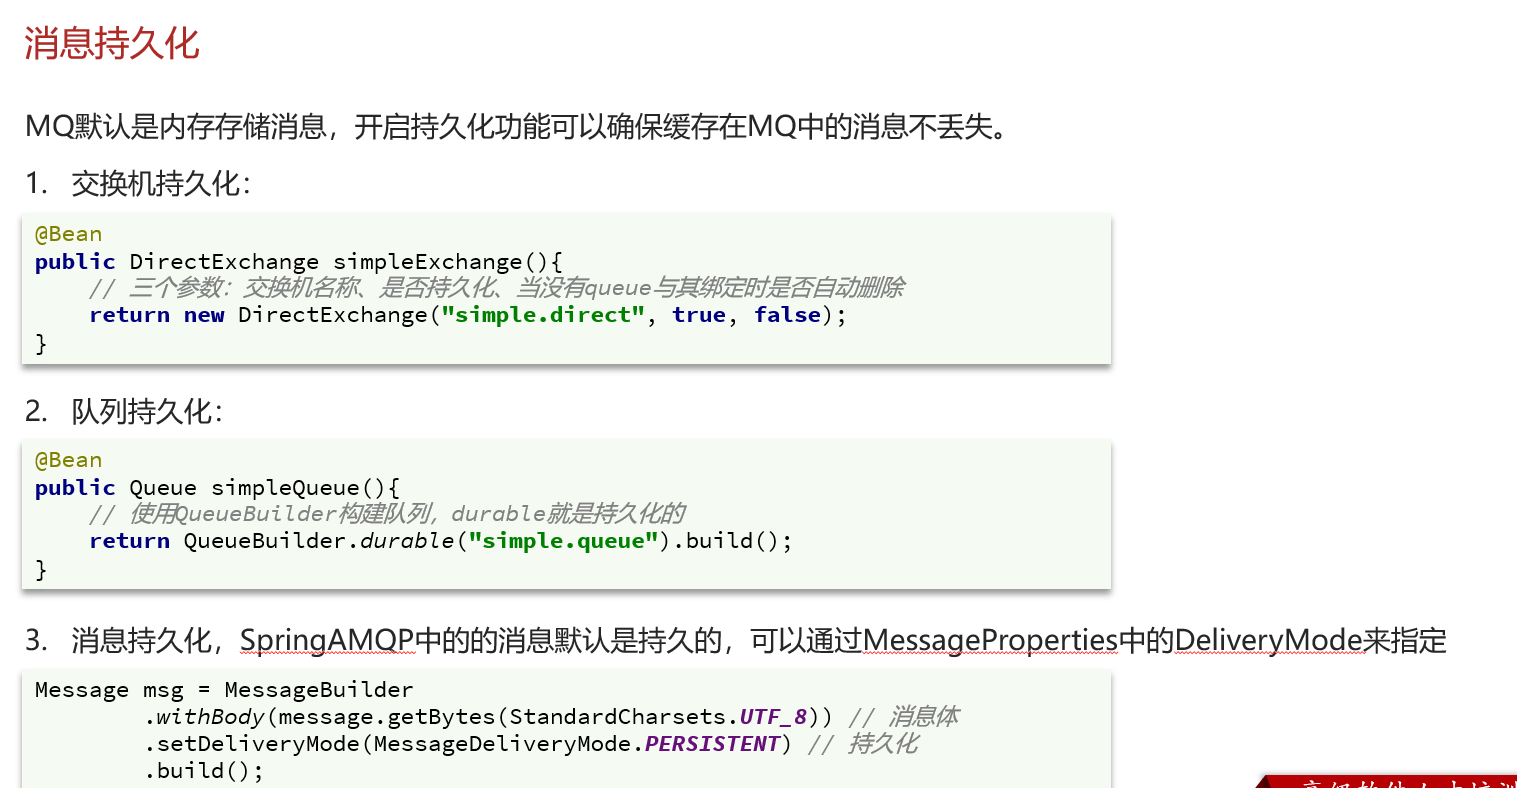
二、消息持久化
MQ默认的是内存存储,如果mq发生了宕机,数据是可能丢失。如果要想数据安全,就要做到持久化,也就是能将数据写进磁盘里
代码:
交换机和队列持久化
1
2
3
4
5
6
7
8
9
10
11
12
13
14
15
16
17
18
19
20
21
22
23
| package cn.itcast.mq.config;
import org.springframework.amqp.core.*;
import org.springframework.context.annotation.Bean;
import org.springframework.context.annotation.Configuration;
@Configuration
public class CommonConfig {
// 交换机持久化
@Bean
public DirectExchange simpleDirect() {
// 三个参数: 交换机名称、是否持久化、 当没有queue与其绑定时是否自动删除
return new DirectExchange( "simple.direct", true, false );
}
// 队列持久化
@Bean
public Queue simpleQueue() {
// 使用QueueBuilder构建队列,durable就是持久化的 nonDurable()非持久化的
return QueueBuilder.durable( "simple.queue" ).build();
}
}
|
交换机、队列持久了,但并不代表消息就能持久了,所以必须做消息持久化

1
2
3
4
| // 1.准备消息 MessageDeliveryMode.PERSISTENT 消息持久化,这样重启mq消息也可以保留
Message message = MessageBuilder.withBody( "hello, spring".getBytes(StandardCharsets.UTF_8) )
.setDeliveryMode( MessageDeliveryMode.PERSISTENT )
.build();
|
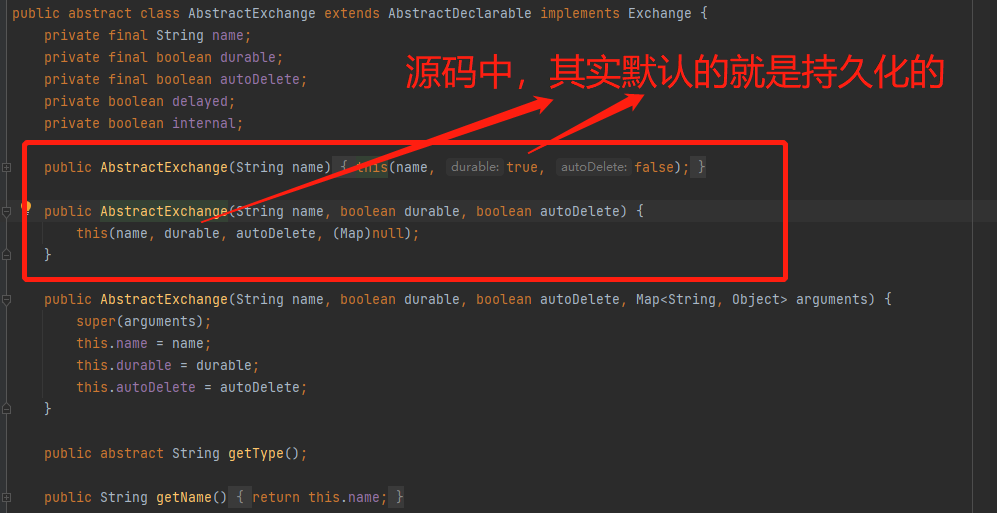
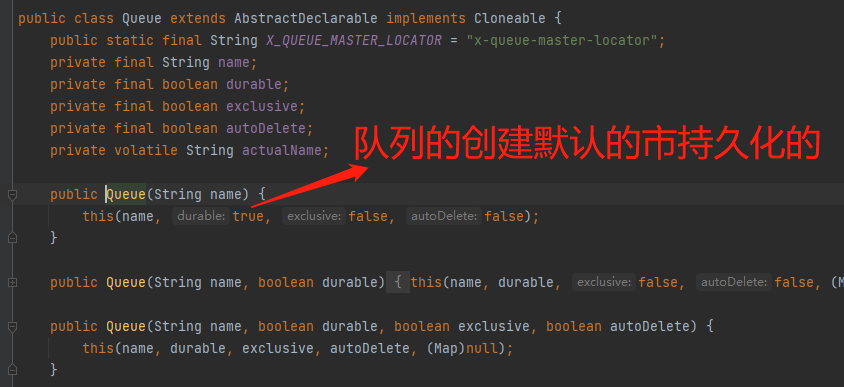
交换机 和 队列 创建 以及 发送消息 的源码其实默认的就是 持久化 的
而之所以学,是因为我们有时候为了提高性能,便可以将一些非必要的设置为 非持久化
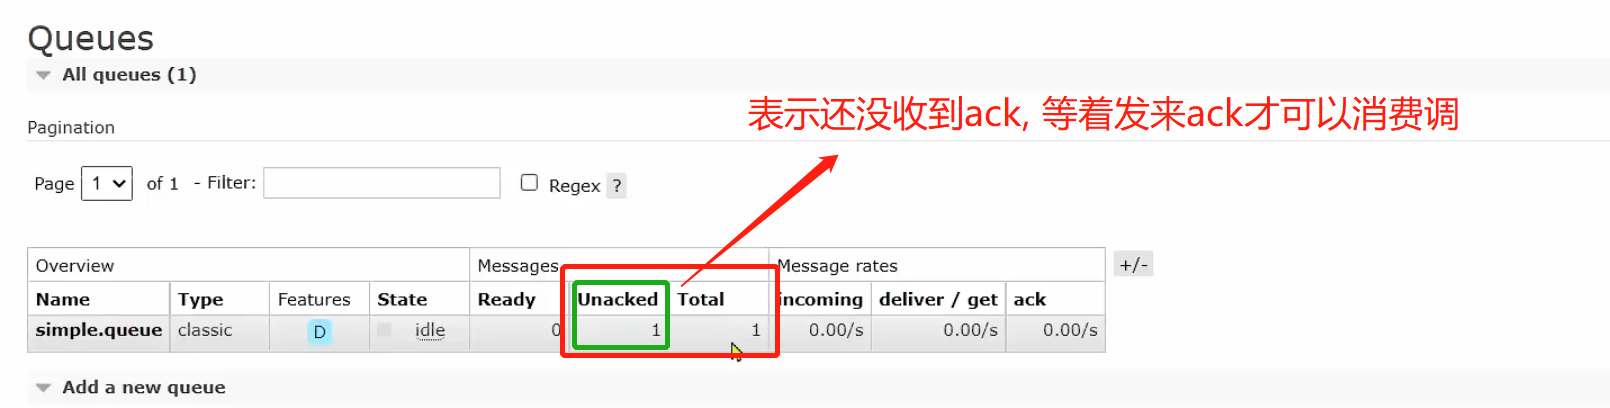
三、消费者消息确认
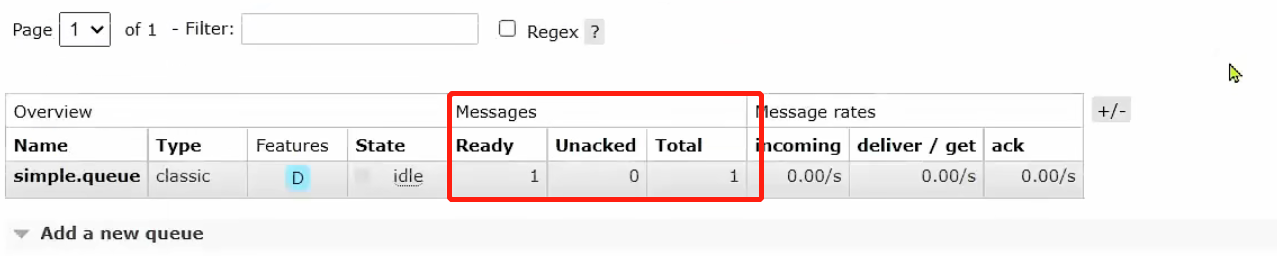
测试 auto:
进入simple.queue生产一条消息
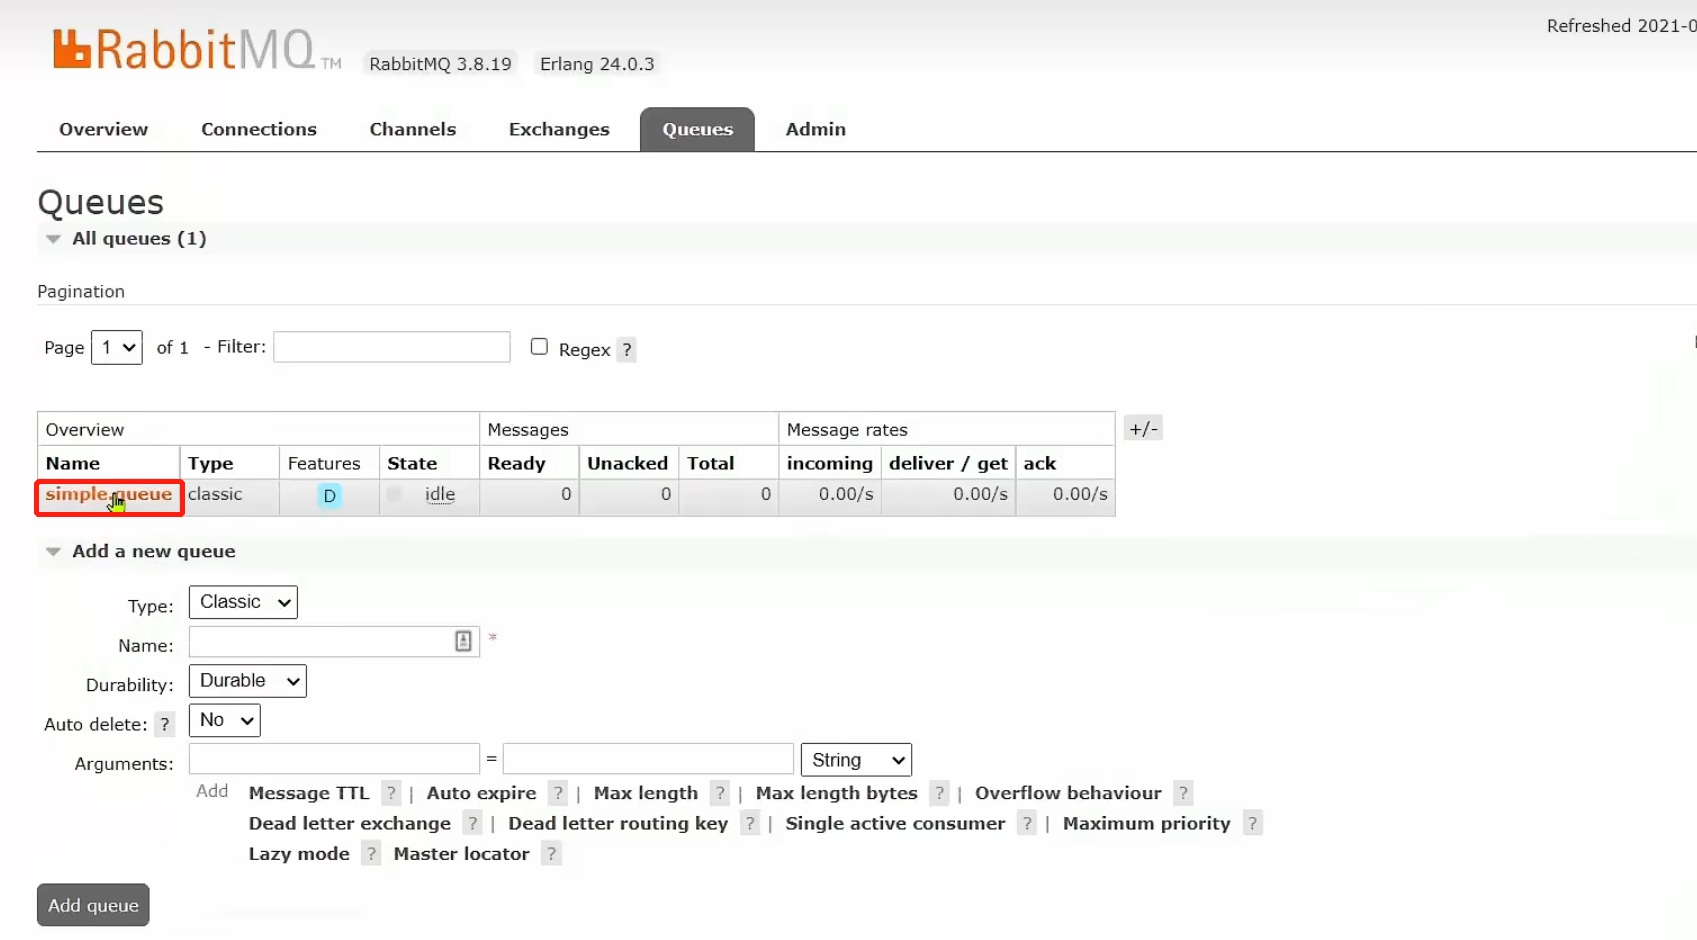
填写 消息并发送
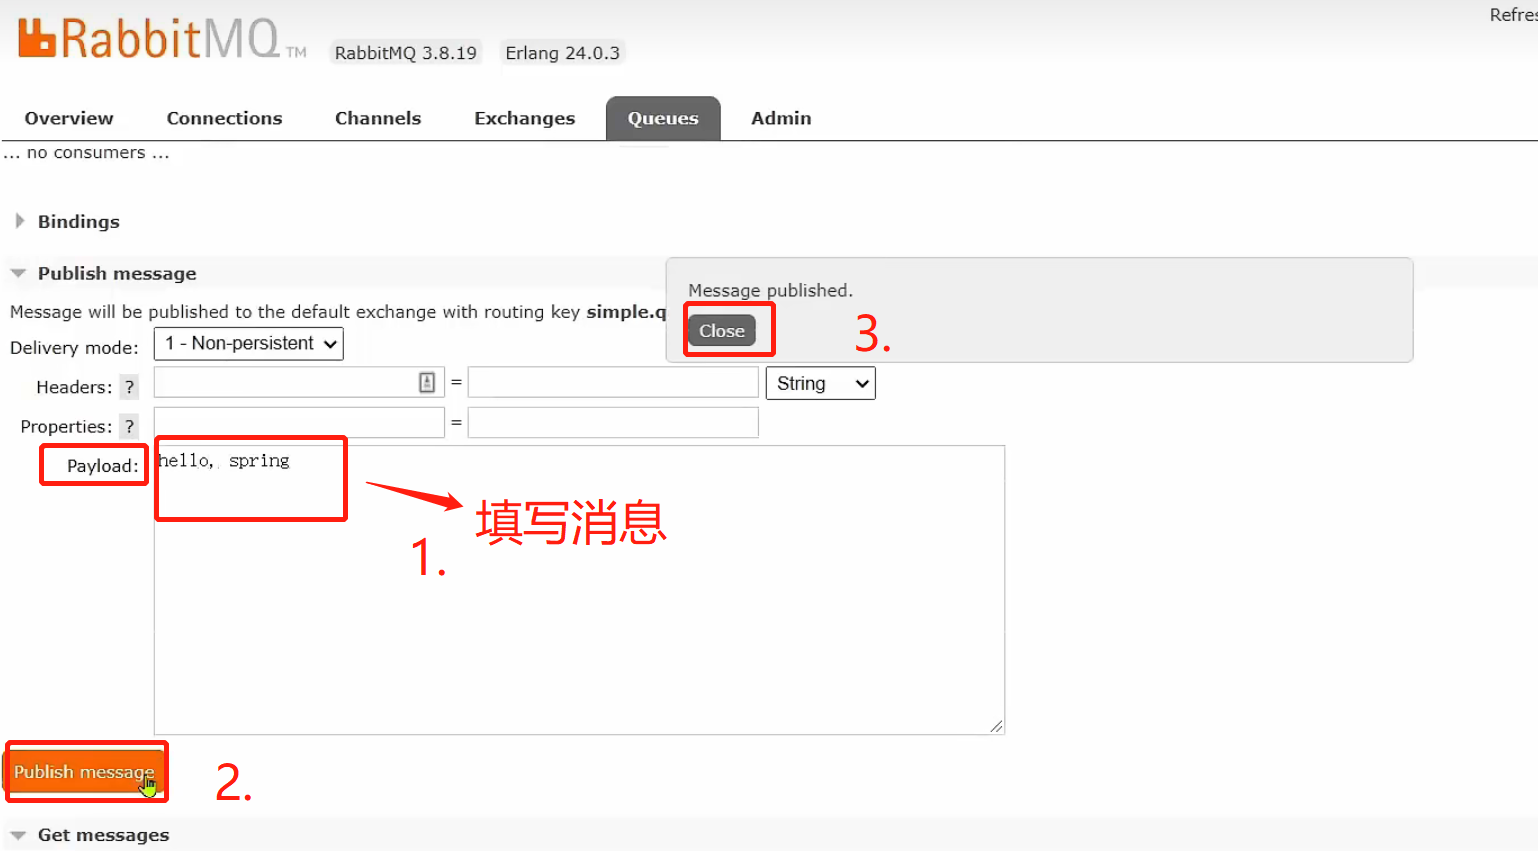
刷新
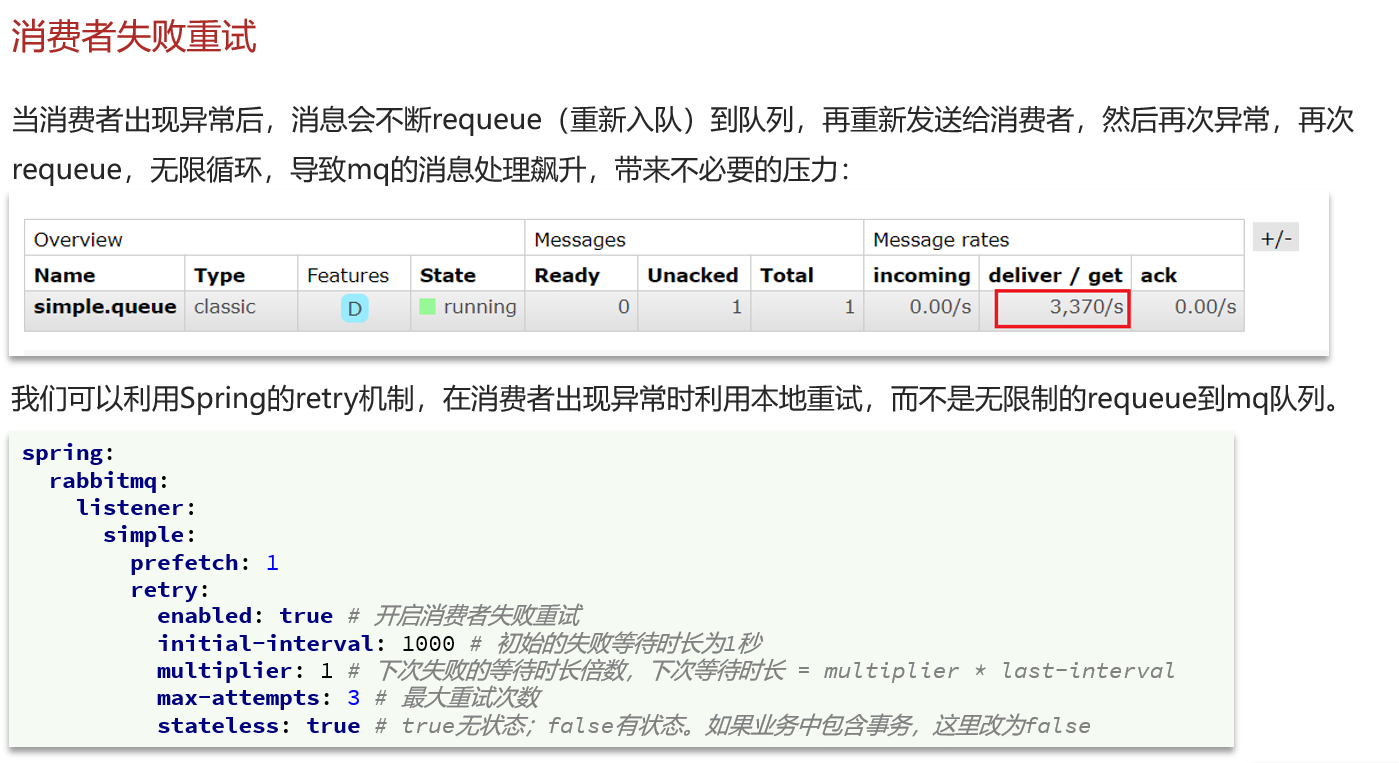
当消费者出现异常后,消息会不断requeue(重新入队)到队列,再重新发送给消费者,然后再次异常,再次requeue,无限循环,导致mq的消息处理飙升,带来不必要的压力: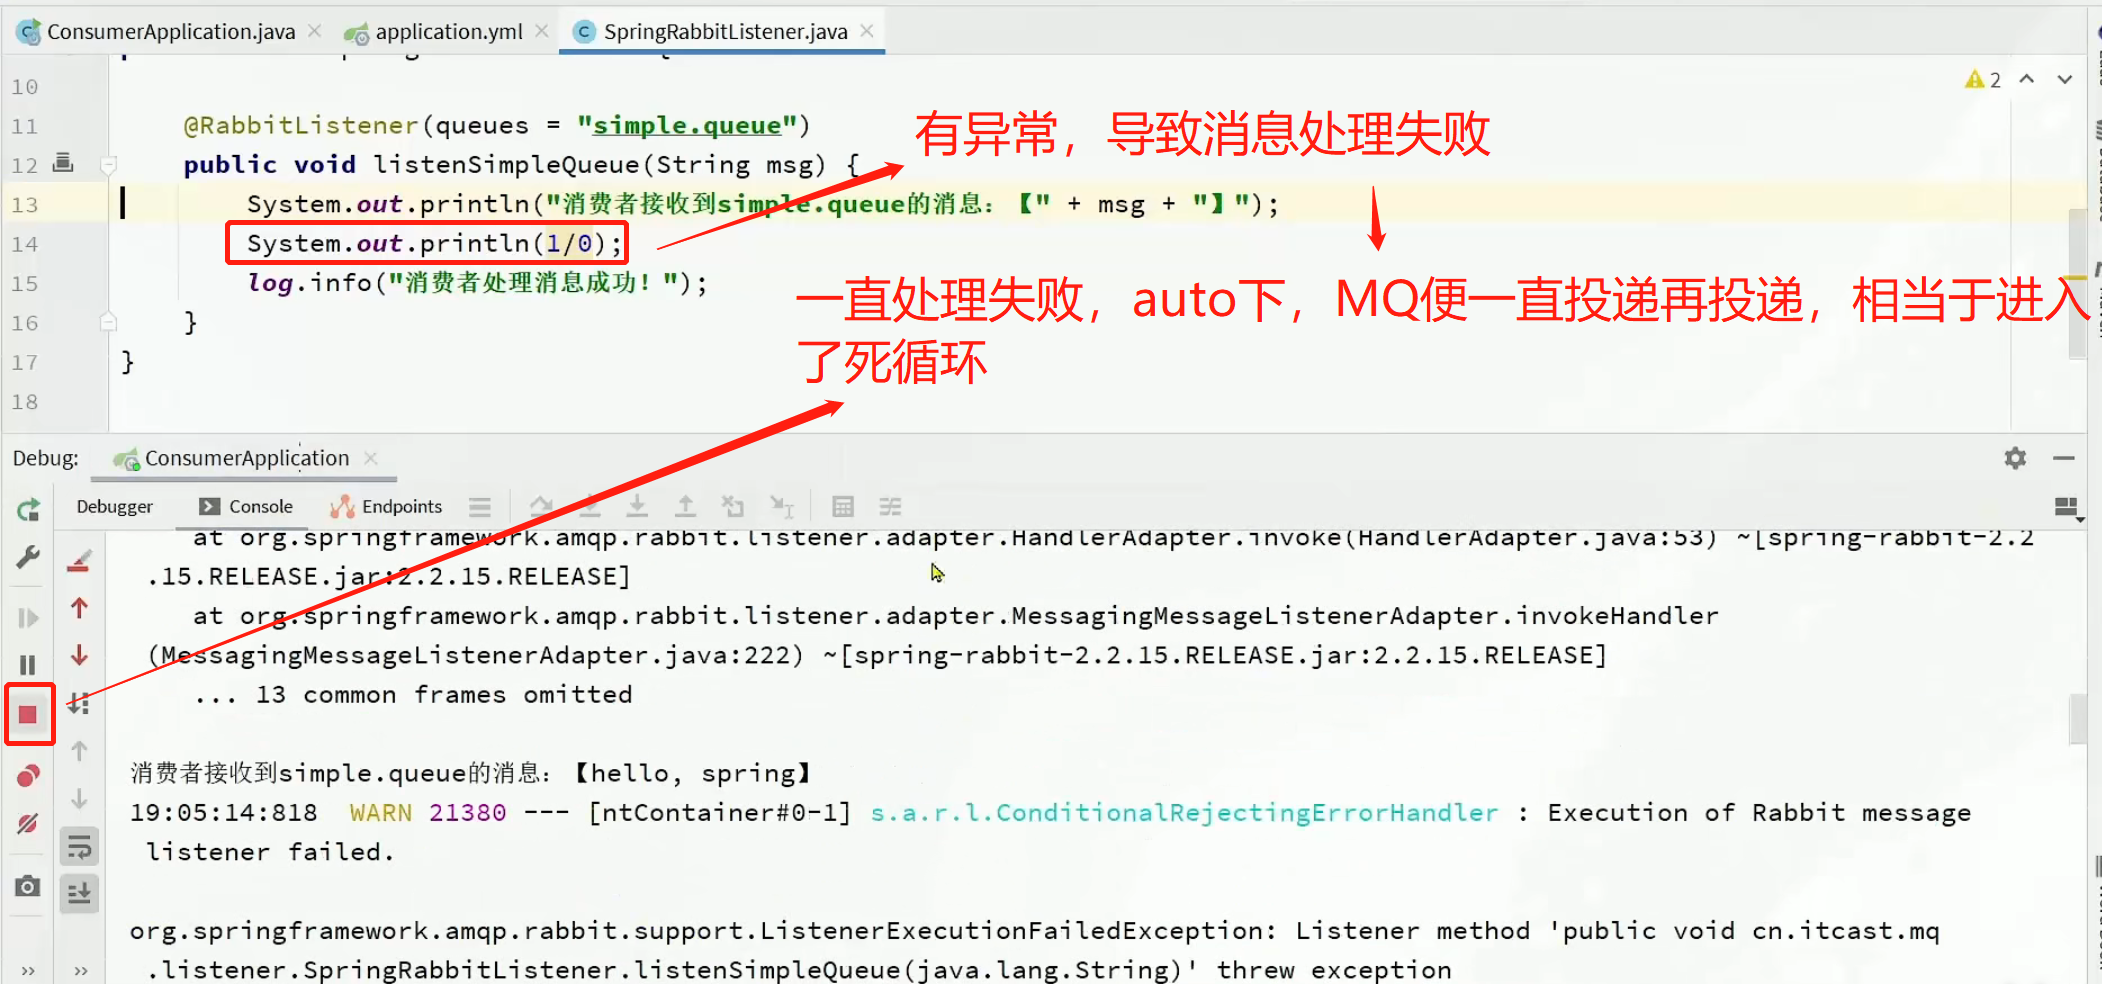
auto模式 这种情况下,虽然也不好,mq一直在尝试,但是至少消息不会丢失,
auto的这种遇到处理失败后一直投递再投递,这种处理方式不太友好,但是可以改的,看四、失败重试机制
四、失败重试机制
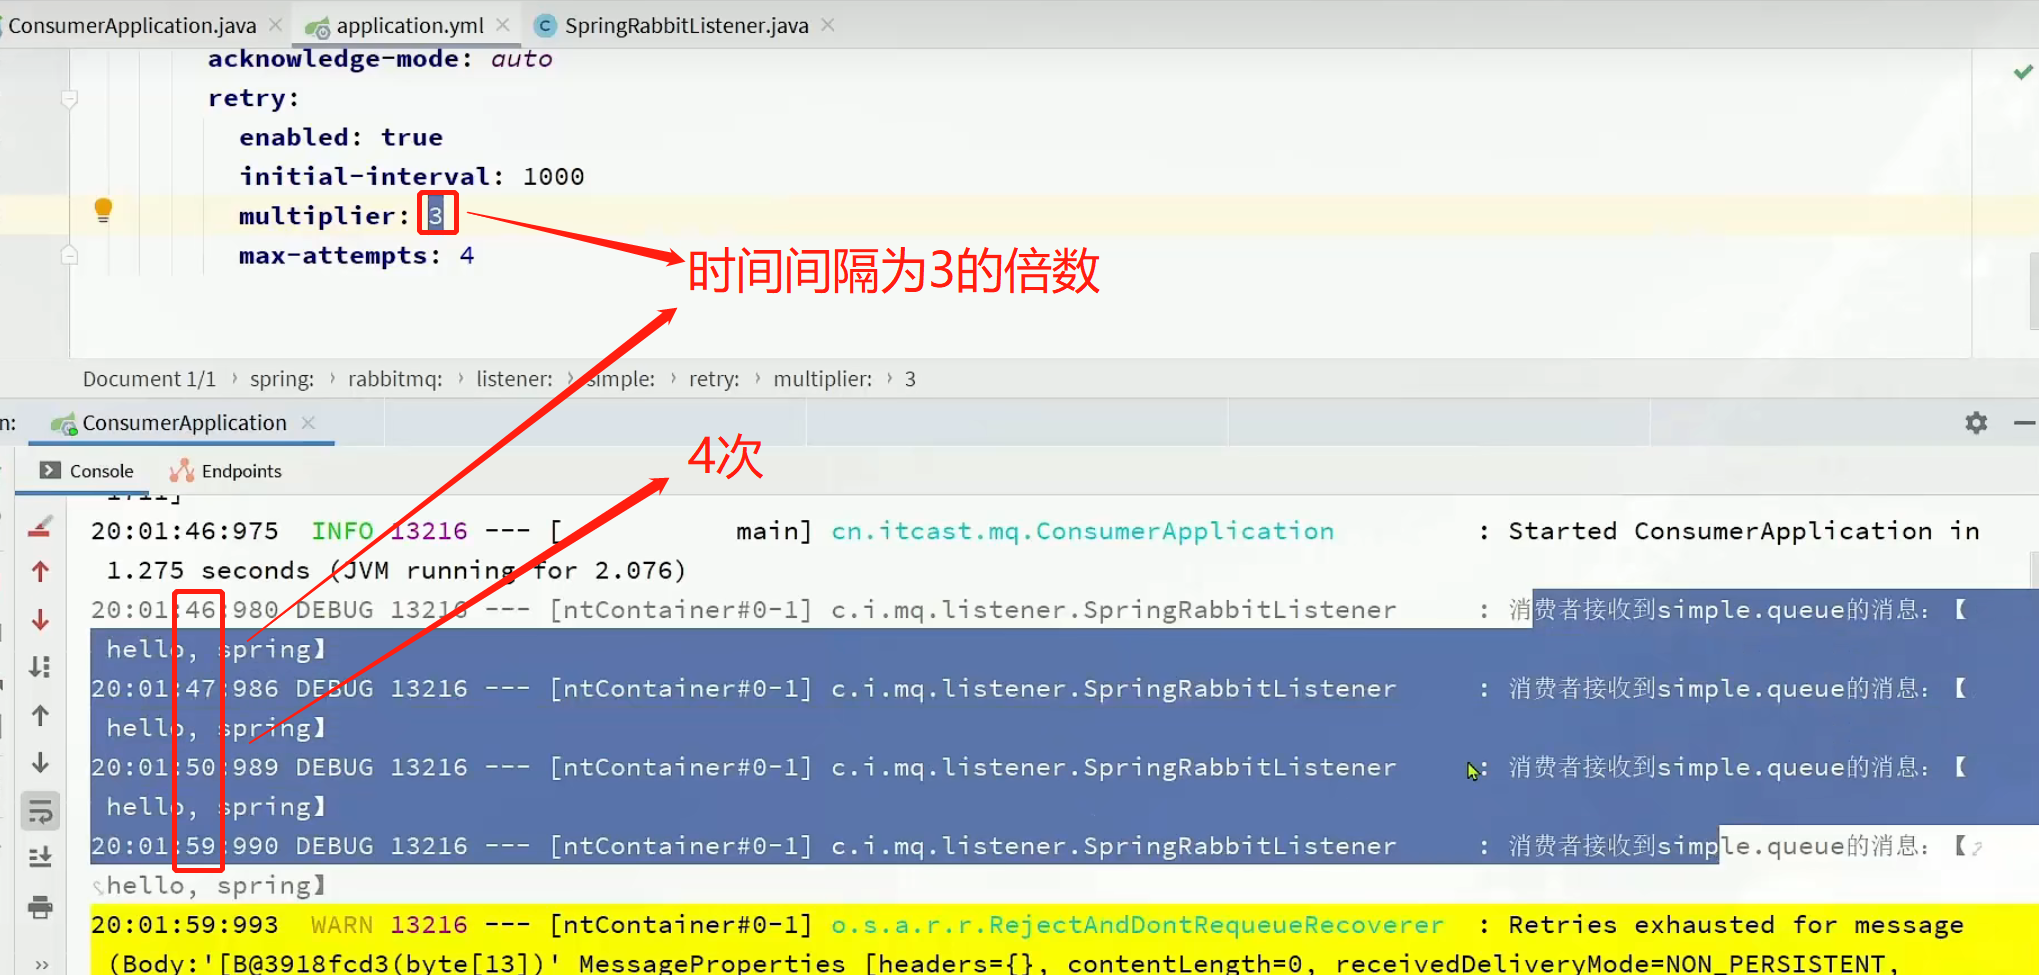

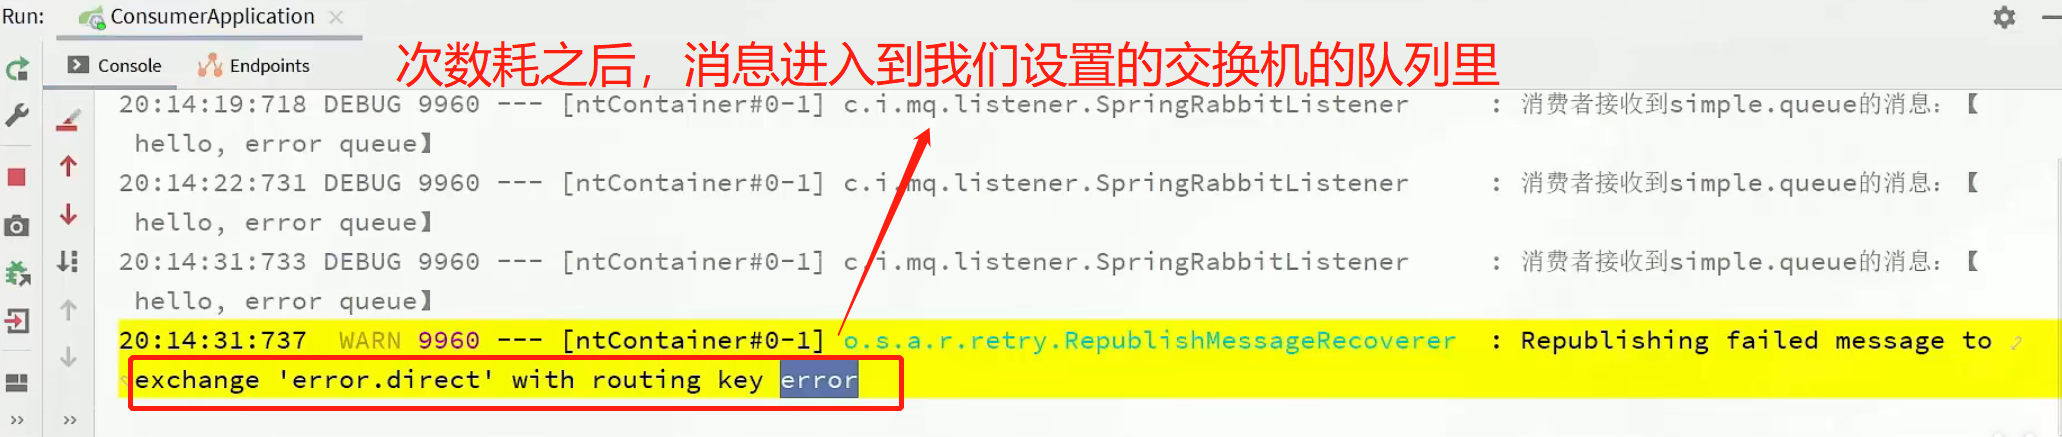
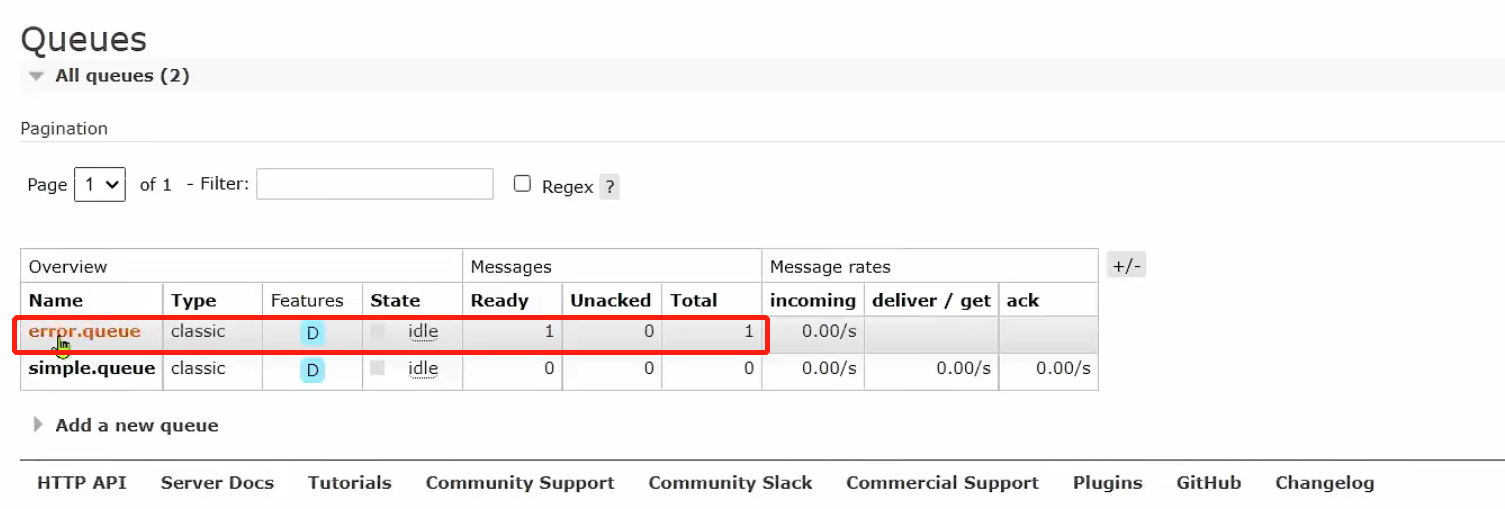
重试次数耗尽之后,其实会返回一个reject拒绝,然后就会把消息丢弃,这是重试机制的默认策略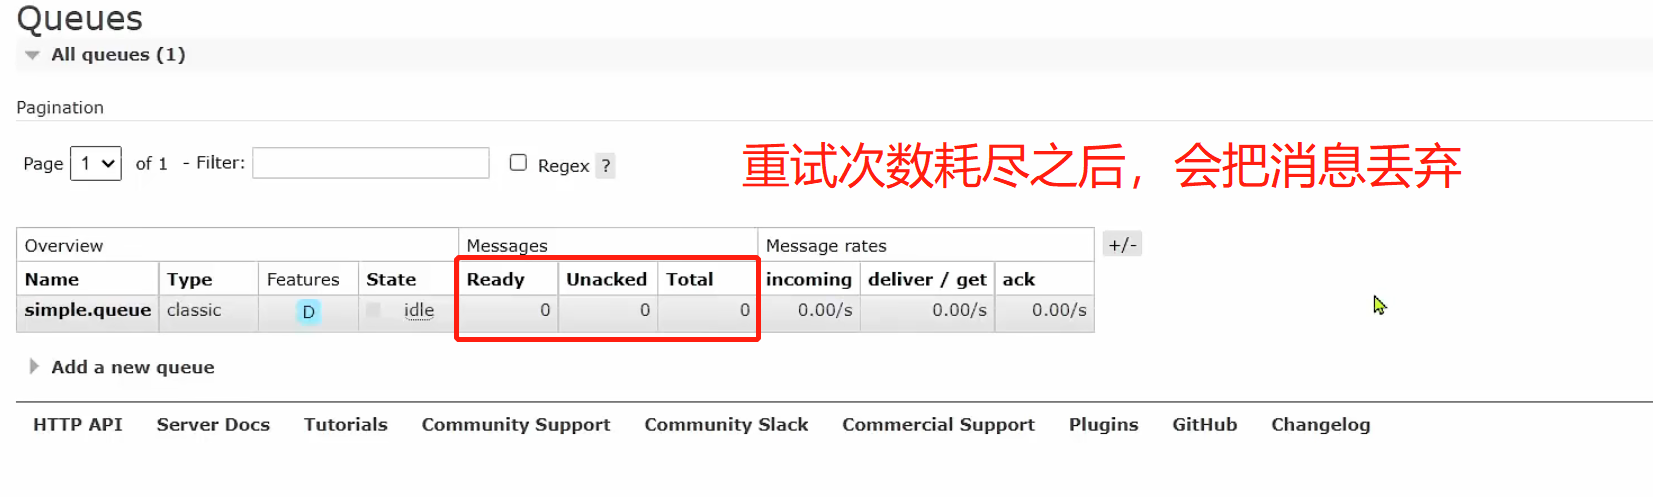
重试次数耗尽之后,会把消息丢弃,事实上丢弃也没事,因为已经重试了那么多次了,还是失败的,即便把消息再丢回给mq,mq再投递给你,也还是会失败。
那么除了丢弃,还有没有其它的策略呢?有的…
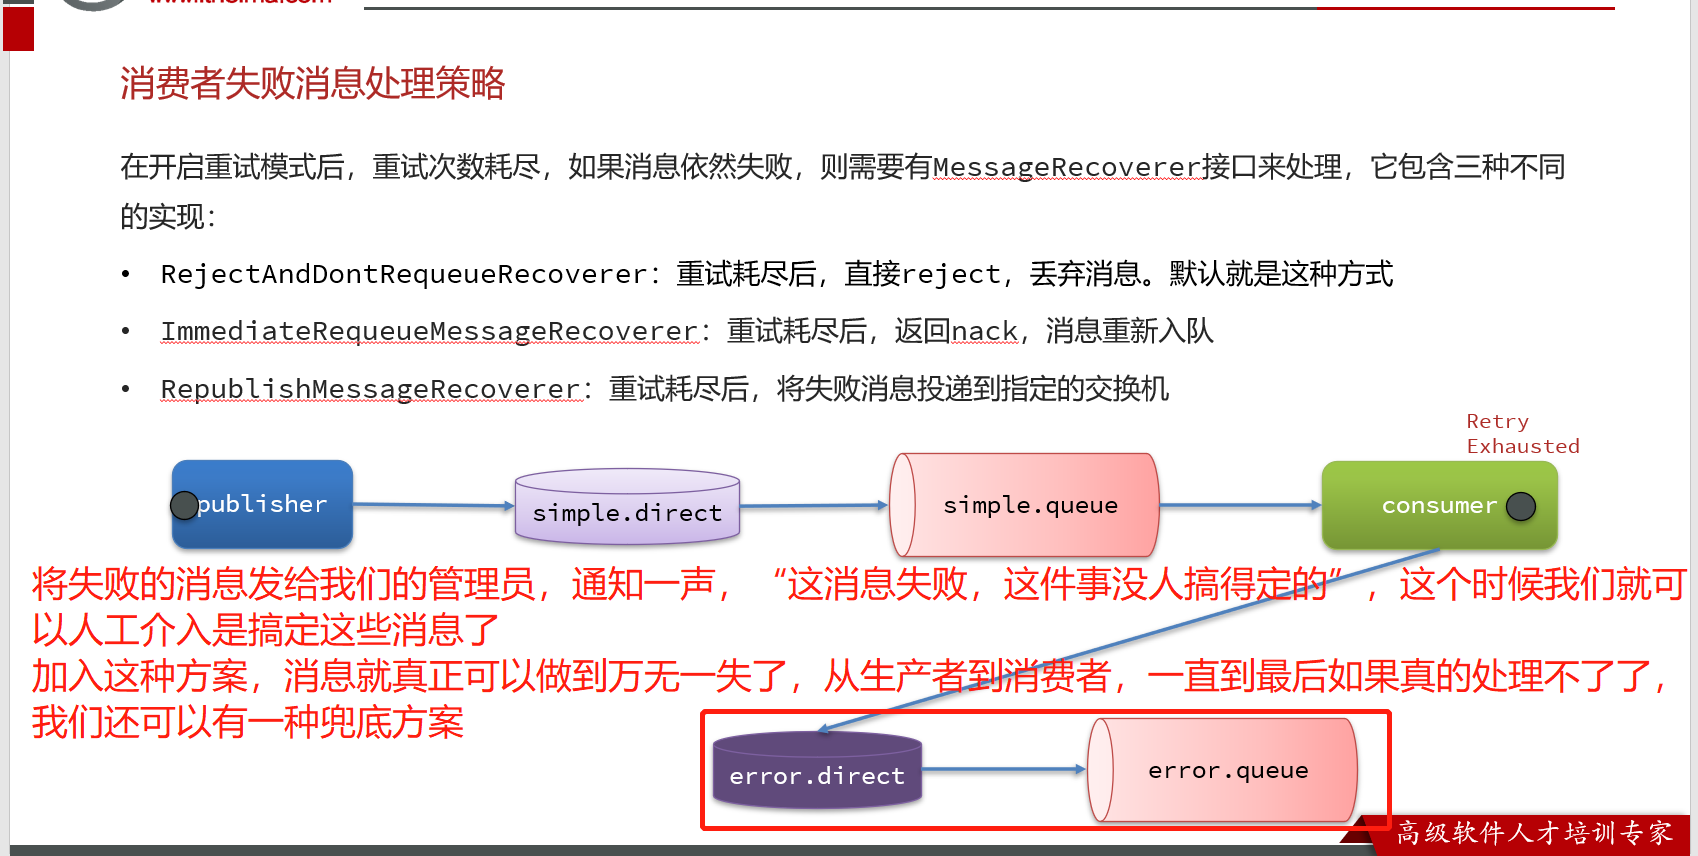
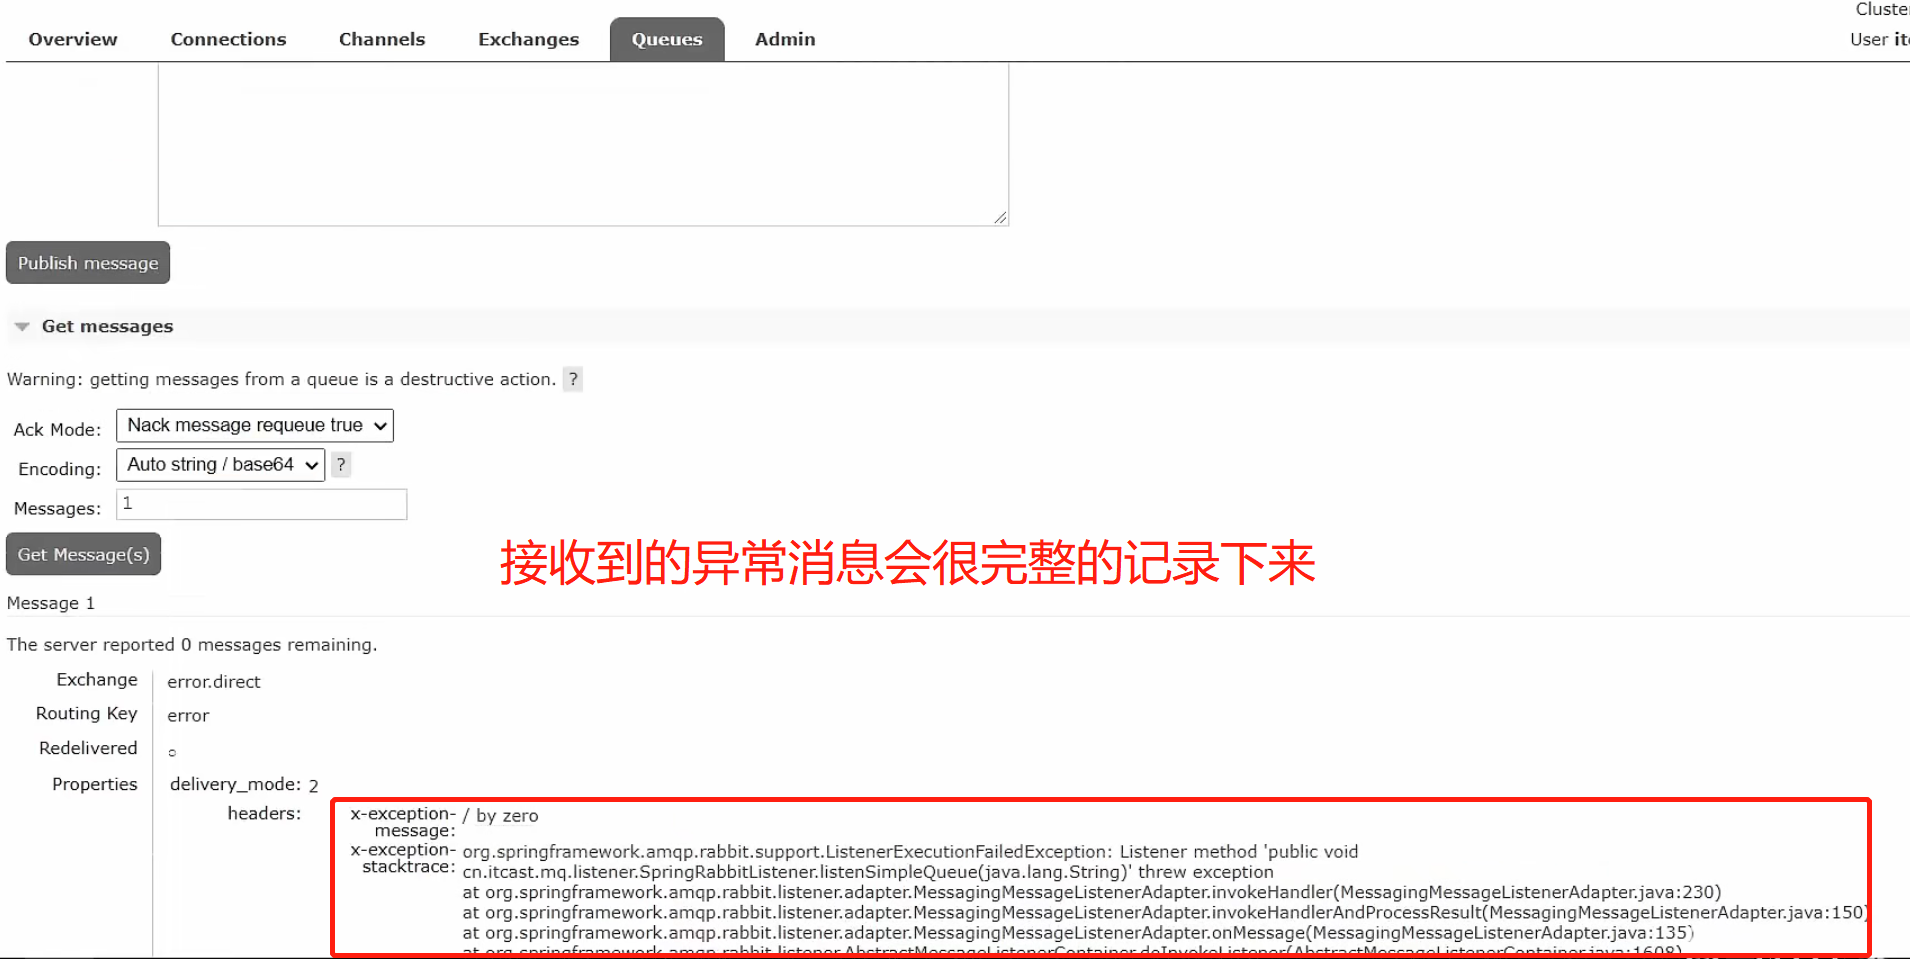
这种方案是最健康的方案了,也建议在生产环境下 使用这种方案

1
2
3
4
5
6
7
8
9
10
11
12
13
14
15
16
17
18
19
20
21
22
23
24
25
26
27
28
29
30
31
32
33
34
35
36
| package cn.itcast.mq.config;
import org.springframework.amqp.core.Binding;
import org.springframework.amqp.core.BindingBuilder;
import org.springframework.amqp.core.DirectExchange;
import org.springframework.amqp.core.Queue;
import org.springframework.amqp.rabbit.core.RabbitTemplate;
import org.springframework.amqp.rabbit.retry.MessageRecoverer;
import org.springframework.amqp.rabbit.retry.RepublishMessageRecoverer;
import org.springframework.context.annotation.Bean;
import org.springframework.context.annotation.Configuration;
@Configuration
public class ErrormessageConfig {
//首先,定义接收失败消息的交换机、队列及其绑定关系:
@Bean
public DirectExchange errorMessageExchange() {
return new DirectExchange( "error.direct" );
}
@Bean
public Queue errorQueue() {
return new Queue( "error.queue" );
}
@Bean
public Binding errorMessageBinding() {
return BindingBuilder.bind( errorQueue() ).to( errorMessageExchange() ).with( "errpr" );
}
//定义RepublishMessageRecoverer 会 覆盖spring默认的默bean (我们想覆盖spring默认的bean,重新定义一个bean即可)
@Bean
public MessageRecoverer republishMessageRecoverer( RabbitTemplate rabbitTemplate ) {
return new RepublishMessageRecoverer( rabbitTemplate, "error.direct", "error" );
}
}
|