将maven项目改造成springboot项目

  1. pom.xml配置之springboot
    1.1 继承springboot父项目依赖
1
2
3
4
5
6
<parent>
<groupId>org.springframework.boot</groupId>
<artifactId>spring-boot-starter-parent</artifactId>
<version>2.7.0</version>
<relativePath/> <!-- lookup parent from repository -->
</parent>

1.2 插件依赖

1
2
3
4
5
6
7
8
9
10
11
12
13
14
15
16
17
 <dependencies>
<dependency>
<groupId>org.springframework.boot</groupId>
<artifactId>spring-boot-starter-web</artifactId>
</dependency>

<dependency>
<groupId>org.springframework.boot</groupId>
<artifactId>spring-boot-starter-test</artifactId>
</dependency>

<dependency>
<groupId>org.springframework.boot</groupId>
<artifactId>spring-boot-starter-aop</artifactId>
</dependency>

</dependencies>
  1. 启动类配置
1
2
3
4
5
6
@SpringBootApplication
public class SquareApplication {
public static void main(String[] args) {
SpringApplication.run(SquareApplication.class,args);
}
}
  1. application.yml

nohup命令让服务器上的程序在后台一直运行,退出终端也可以保持程序运行

(本博文的方法对于阿里云和腾讯与服务器都适用 )

场景:

部署一个后端程序(climate-0.0.1-SNAPSHOT.jar)到我腾讯云的服务器上,常规启动命令如下:

1
java -jar climate-0.0.1-SNAPSHOT.jar

上图表示项目部署成功,便可以在浏览器上进行访问

但是关闭终端后,就不能访问了,也就达不到上线的效果。

而我们想项目程序在关闭退出终端后,也一样继续运行,

这时候需要使用 nohup 命令启动(该命令可以在你退出帐户/关闭终端之后继续运行相应的进程)

输入如下命令:

1
nohup java -jar climate-0.0.1-SNAPSHOT.jar

但是会报错(表示:执行nohup命令的时候,经常会没有写入权限的错误)

1、原因

是因为使用 nohup 会产生日志文件,默认写入到 nohup.out

2、解决

将 nohup 的日志输出到 /dev/null,这个目录会让所有到它这的信息自动消失

1
nohup java -jar climate-0.0.1-SNAPSHOT.jar > /dev/null 2> /dev/null &

其它解决方法:
就是在末尾直接加一个&就就能够直接在后台运行

1
nohup java -jar climate-0.0.1-SNAPSHOT.jar & 

停止进程

如果想停止进程运行的话,可通过命令(kill -9 进程号PID)进程号来杀死

另外也可以使用 ps -def | grep “进程名” 命令来查找PID。

找到 PID 后,就可以使用 kill PID 来删除。

1
kill -9  进程号PID

如果发现启动时,查看日志发现端口号被占了

lsof -i:[端口号] 查看使用某端口的进程

1
lsof -i:[端口号] 

然后使用kill杀掉进城后再启动

终止后台运行的进程

1
kill -9  进程号PID

比如:发现 6868 端口被占用了

image-20230430132617648

Spring Boot-MyBatis配置带下划线命名的字段自动转换驼峰命名解决方案

问题描述
MyBatis无法查询出属性名和数据库字段名不完全相同的数据。

即:属性名和数据库字段名分别为驼峰命名和下划线命名时查出的数据为NULL。

问题分析
MyBatis默认是属性名和数据库字段名一一对应的,即

数据库表列:user_name

实体类属性:user_name

但是java中一般使用驼峰命名

数据库表列:user_name

实体类属性:userName

实体类属性:userName

解决方案 (开启驼峰命名转换)
在Spring Boot中,可以通过设置map-underscore-to-camel-case属性为true来开启驼峰功能。

MyBatis配置:

application.properties中:

1
mybatis.configuration.map-underscore-to-camel-case=true

application.yml中:

1
2
3
mybatis:
configuration:
map-underscore-to-camel-case: true

mybatisplus + 数据库 相关注解

关联:

pom.xml配置注入依赖:

1
2
3
4
5
6
7
8
9
10
11
12
13
14
15
16
17
<!--        mybatisplus+数据库相关开始-->
<dependency>
<groupId>com.baomidou</groupId>
<artifactId>mybatis-plus-boot-starter</artifactId>
<version>3.4.2</version>
</dependency>
<dependency>
<groupId>mysql</groupId>
<artifactId>mysql-connector-java</artifactId>
<scope>runtime</scope>
</dependency>
<dependency>
<groupId>org.projectlombok</groupId>
<artifactId>lombok</artifactId>
<optional>true</optional>
</dependency>
<!-- mybatisplus+数据库相关结束-->

(rabbitmq的高级特性)消息可靠性

对应的教程视频:

高级篇Day5-01-MQ常见问题及消息可靠性_哔哩哔哩_bilibili

一、生产者消息确认

1.在生成者这个微服务的apllication.yml中添加配置

1
2
3
4
5
6
spring:
rabbitmq:
publisher-confirm-type: correlated
publisher-returns: true
template:
mandatory: true

2.每个RabbitTemplate只能配置一个ReturnCallback,因此需要在项目启动过程中配置

代码:

1
2
3
4
5
6
7
8
9
10
11
12
13
14
15
16
17
18
19
20
21
22
23
24
25
26
27
28
29
30
31
32
33
34
35
import lombok.extern.slf4j.Slf4j;
import org.springframework.amqp.rabbit.core.RabbitTemplate;
import org.springframework.beans.BeansException;
import org.springframework.context.ApplicationContext;
import org.springframework.context.ApplicationContextAware;
import org.springframework.context.annotation.Configuration;
/*
ApplicationContextAware : spring 的bean工厂的通知
*/
@Slf4j //记录日志
@Configuration
public class CommonConfig implements ApplicationContextAware {

@Override
public void setApplicationContext(ApplicationContext applicationContext) throws BeansException {
// 从bean工厂中获取 RabbitTemplate 对象
RabbitTemplate rabbitTemplate = applicationContext.getBean( RabbitTemplate.class );
// 配置ReturnCallback
// rabbitTemplate.setReturnCallback(new RabbitTemplate.ReturnCallback() {
// // 像这种里面只有一个方法的,把鼠标方法 new 前面,会提醒 推荐用lambda表达式,快捷键 Alt + Enter
// @Override
// public void returnedMessage(Message message, int i, String s, String s1, String s2) {
//
// }
// });
// 像这种里面只有一个方法的,把鼠标方法 new 前面,会提醒 推荐用lambda表达式,快捷键 Alt + Enter
rabbitTemplate.setReturnCallback((message, replyCode, replyText, exchange, routingKey) -> {
// 记录日志 【 {}是占位符,replyCode, replyText, exchange...会依次填进占位符里的 】
log.error( "消息发送到队列失败,响应码:{}, 失败原因:{}, 交换机:{}, 路由key:{}, 消息:{}",
replyCode, replyText, exchange, routingKey, message.toString() );

// 如果有需要的话,可以重发消息
});
}
}

3.发送消息,指定消息ID、消息ConfirmCallback

代码:

1
2
3
4
5
6
7
8
9
10
11
12
13
14
15
16
17
18
19
20
21
22
23
24
25
26
27
28
29
30
31
32
33
34
35
36
37
38
39
40
41
42
43
44
45
46
47
48
49
import lombok.extern.slf4j.Slf4j;
import org.junit.Test;
import org.junit.runner.RunWith;
import org.springframework.amqp.rabbit.connection.CorrelationData;
import org.springframework.amqp.rabbit.core.RabbitTemplate;
import org.springframework.beans.factory.annotation.Autowired;
import org.springframework.boot.test.context.SpringBootTest;
import org.springframework.test.context.junit4.SpringRunner;
import org.springframework.util.concurrent.FailureCallback;
import org.springframework.util.concurrent.SuccessCallback;

import java.util.UUID;

@Slf4j
@RunWith(SpringRunner.class)
@SpringBootTest
public class SpringAmqpTest {
@Autowired
private RabbitTemplate rabbitTemplate;

@Test
public void testSendMessage2SimpleQueue() throws InterruptedException {
// 1.准备消息
String message = "hello, spring amqp!";

// 2.准备CorrelationData
// 2.1.消息ID
CorrelationData correlationData = new CorrelationData( UUID.randomUUID().toString() );
// 2.2.准备ConfirmCallback


correlationData.getFuture().addCallback(result -> { //成功回调
// 判断结果
if( result.isAck() ) {
// ACK
log.debug( "消息成功投递到交换机!消息ID:{}", correlationData.getId() );
} else {
//NACK
log.error( "消息投递到交换机失败!消息ID:{}", correlationData.getId() );
// 重发消息
}
}, ex -> { //失败回调
//记录日志
log.error( "消息发送失败!", ex );
});
// 2.发送消息
rabbitTemplate.convertAndSend("amq.topic", "simple.text", message);
}
}

测试:

(给交换机添加绑定关系,这一步看情况做,如果绑定关系已经有的了的表不需要这一步)

测试错误例子

4.总结

SpringAMQP中处理消息确认的几种情况:

publisher-comfirm:

• 消息成功发送到exchange,返回ack

• 消息发送失败,没有到达交换机,返回nack

• 消息发送过程中出现异常,没有收到回执

消息成功发送到exchange,但没有路由到queue,调用ReturnCallback

二、消息持久化

MQ默认的是内存存储,如果mq发生了宕机,数据是可能丢失。如果要想数据安全,就要做到持久化,也就是能将数据写进磁盘里

代码:

交换机和队列持久化

1
2
3
4
5
6
7
8
9
10
11
12
13
14
15
16
17
18
19
20
21
22
23
package cn.itcast.mq.config;

import org.springframework.amqp.core.*;
import org.springframework.context.annotation.Bean;
import org.springframework.context.annotation.Configuration;

@Configuration
public class CommonConfig {

// 交换机持久化
@Bean
public DirectExchange simpleDirect() {
// 三个参数: 交换机名称、是否持久化、 当没有queue与其绑定时是否自动删除
return new DirectExchange( "simple.direct", true, false );
}

// 队列持久化
@Bean
public Queue simpleQueue() {
// 使用QueueBuilder构建队列,durable就是持久化的 nonDurable()非持久化的
return QueueBuilder.durable( "simple.queue" ).build();
}
}

交换机、队列持久了,但并不代表消息就能持久了,所以必须做消息持久化

1
2
3
4
// 1.准备消息   MessageDeliveryMode.PERSISTENT 消息持久化,这样重启mq消息也可以保留
Message message = MessageBuilder.withBody( "hello, spring".getBytes(StandardCharsets.UTF_8) )
.setDeliveryMode( MessageDeliveryMode.PERSISTENT )
.build();

交换机 和 队列 创建 以及 发送消息 的源码其实默认的就是 持久化

而之所以学,是因为我们有时候为了提高性能,便可以将一些非必要的设置为 非持久化

三、消费者消息确认

测试 auto:

进入simple.queue生产一条消息

填写 消息并发送

刷新

当消费者出现异常后,消息会不断requeue(重新入队)到队列,再重新发送给消费者,然后再次异常,再次requeue,无限循环,导致mq的消息处理飙升,带来不必要的压力

auto模式 这种情况下,虽然也不好,mq一直在尝试,但是至少消息不会丢失,

auto的这种遇到处理失败后一直投递再投递,这种处理方式不太友好,但是可以改的,看四、失败重试机制

四、失败重试机制

重试次数耗尽之后,其实会返回一个reject拒绝,然后就会把消息丢弃,这是重试机制的默认策略

重试次数耗尽之后,会把消息丢弃,事实上丢弃也没事,因为已经重试了那么多次了,还是失败的,即便把消息再丢回给mq,mq再投递给你,也还是会失败。

那么除了丢弃,还有没有其它的策略呢?有的…

这种方案是最健康的方案了,也建议在生产环境下 使用这种方案

1
2
3
4
5
6
7
8
9
10
11
12
13
14
15
16
17
18
19
20
21
22
23
24
25
26
27
28
29
30
31
32
33
34
35
36
package cn.itcast.mq.config;

import org.springframework.amqp.core.Binding;
import org.springframework.amqp.core.BindingBuilder;
import org.springframework.amqp.core.DirectExchange;
import org.springframework.amqp.core.Queue;
import org.springframework.amqp.rabbit.core.RabbitTemplate;
import org.springframework.amqp.rabbit.retry.MessageRecoverer;
import org.springframework.amqp.rabbit.retry.RepublishMessageRecoverer;
import org.springframework.context.annotation.Bean;
import org.springframework.context.annotation.Configuration;

@Configuration
public class ErrormessageConfig {

//首先,定义接收失败消息的交换机、队列及其绑定关系:
@Bean
public DirectExchange errorMessageExchange() {
return new DirectExchange( "error.direct" );
}
@Bean
public Queue errorQueue() {
return new Queue( "error.queue" );
}
@Bean
public Binding errorMessageBinding() {
return BindingBuilder.bind( errorQueue() ).to( errorMessageExchange() ).with( "errpr" );
}

//定义RepublishMessageRecoverer 会 覆盖spring默认的默bean (我们想覆盖spring默认的bean,重新定义一个bean即可)
@Bean
public MessageRecoverer republishMessageRecoverer( RabbitTemplate rabbitTemplate ) {
return new RepublishMessageRecoverer( rabbitTemplate, "error.direct", "error" );
}

}

hexo博客上的图片路径问题解决方法

  1. 通过下面命令下载插件:
1
npm i hexo-renderer-marked

image-20221107182147634

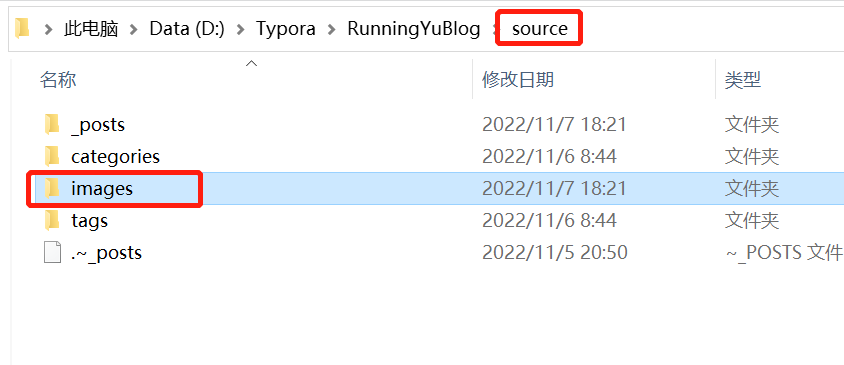
  1. 在自己的博客的source路劲下新建一个images文件夹

image-20221107182334417

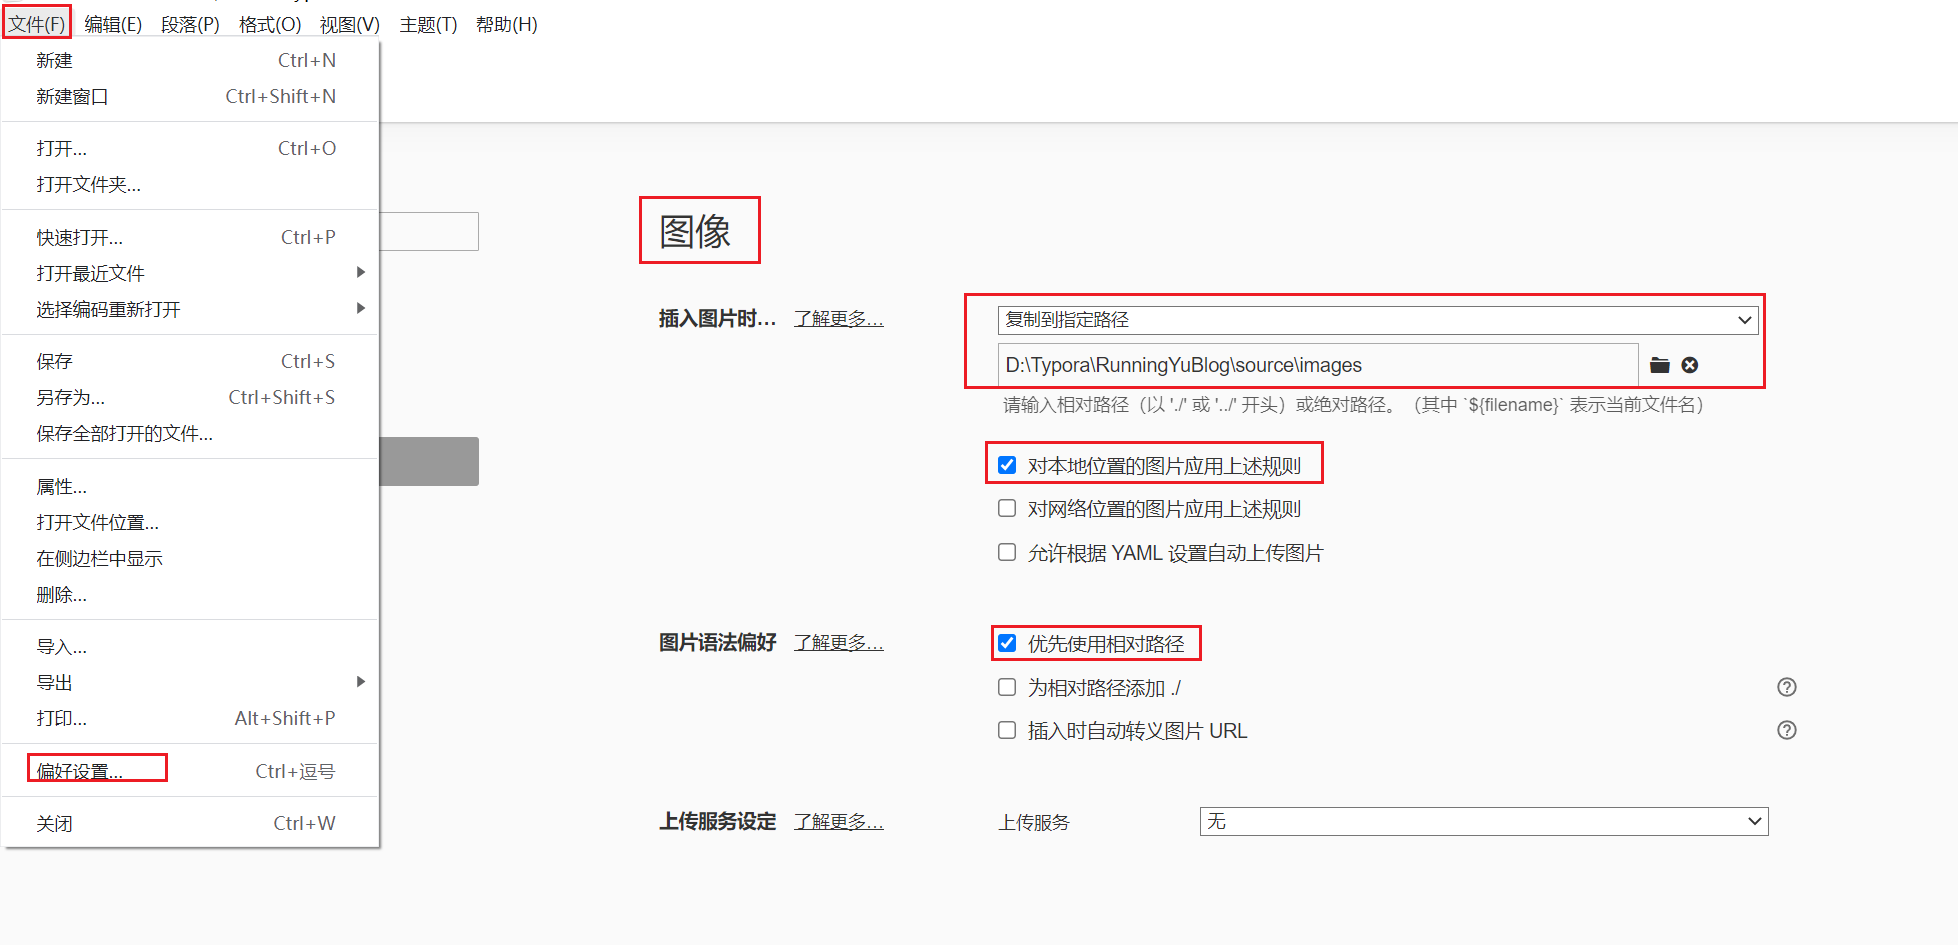
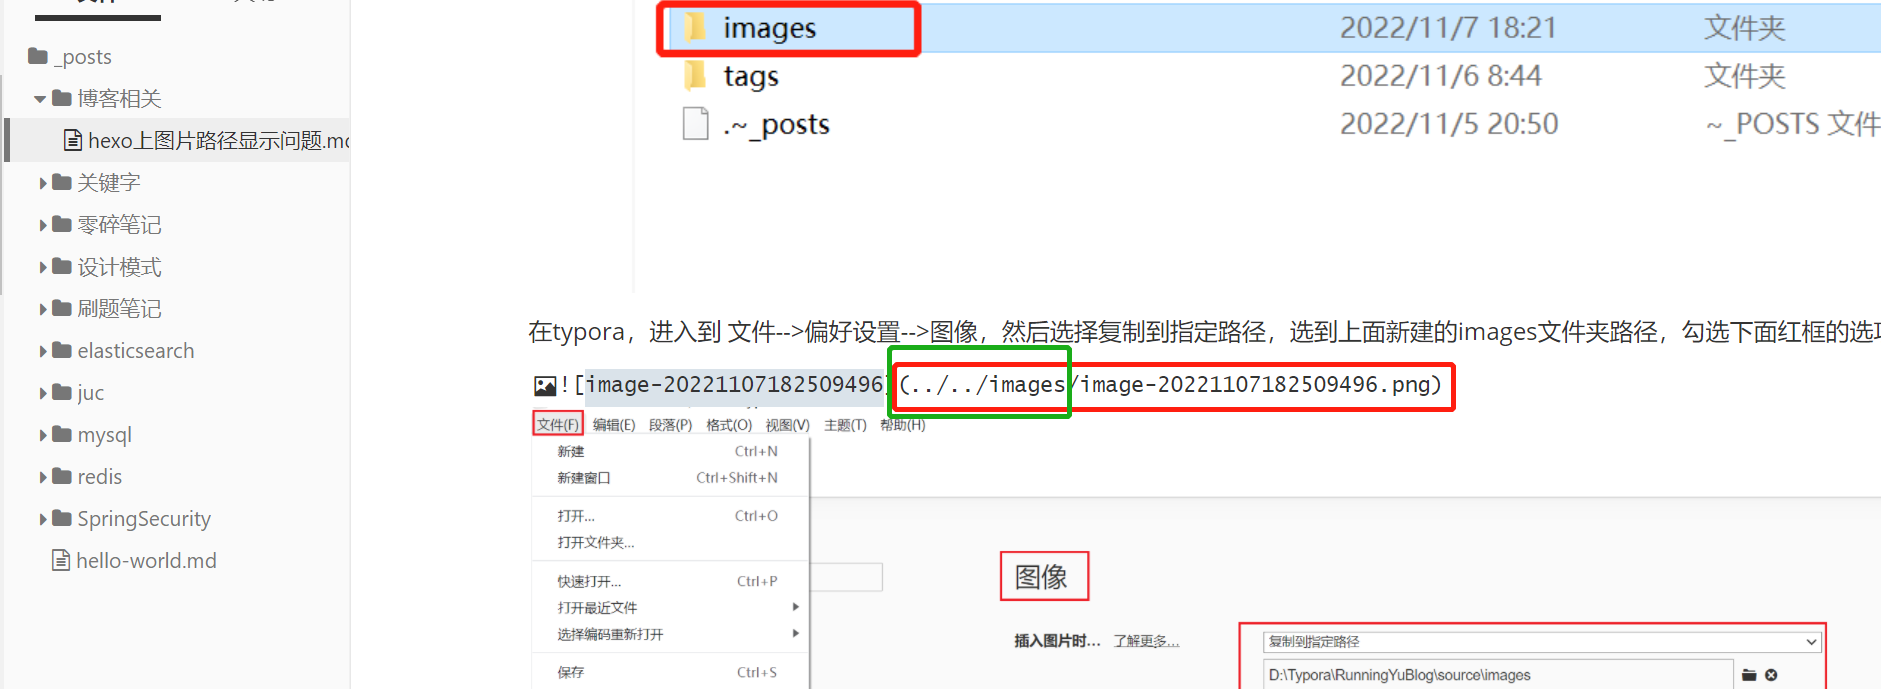
  1. 在typora,进入到 文件–>偏好设置–>图像,然后选择复制到指定路径,选到上面新建的images文件夹路径,勾选下面红框的选项

image-20221107182509496

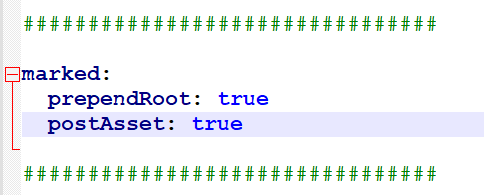
  1. 修改你博客的配置文件**_config.yml**

    1. 修改配置:image-20221107183227789

    2. 添加上下面语句:image-20221107183236670

      1
      2
      3
      marked:
      prependRoot: true
      postAsset: true

之后,你每次复制图片过来,图片路径就是相对路径了image-20221107182744468

当然,对于网络位置的图片回自动是网络上的图片链接,这种图片在博客上是完全没问题的,比如:

image-20221107182938178

mapping索引属性 & 创建索的操作

概念对比

一. mapping索引属性

二. 索引库的操作

1. 创建索引库

实例:

1
2
3
4
5
6
7
8
9
10
11
12
13
14
15
16
17
18
19
20
21
22
23
24
25
26
27
#创建索引库
PUT /heima
{
"mappings": {
"properties": {
"info": {
"type": "text",
"analyzer": "ik_smart"
},
"email": {
"type": "keyword",
"index": false
},
"name": {
"type": "object",
"properties": {
"firstname": {
"type": "keyword"
},
"lastname": {
"type": "keyword"
}
}
}
}
}
}

2. 索引库的其他操作(查看,删除,修改(只能添加新的字段)):

ps:索引库创建好后

    理论上是可以进行修改的

    但是实际开发中,是**禁止去修改**原有的字段的(**但可以添加新的字段**),因为修改会**对性能的影响是很大**的,可能会导致整个库都不可用

(实例)代码:

1
2
3
4
5
6
7
8
9
10
11
12
13
14
15
# 查询
GET /heima

# 修改索引库,添加新字段
PUT /heima/_mapping
{
"properties": {
"age": {
"type": "integer"
}
}
}

# 删除
DELETE /heima

RestClient操作索引库-初始化RestClient

1.引入es的RestHighLevelClient依赖:

1
2
3
4
5
6
<!--elasticsearch-->
<dependency>
<groupId>org.elasticsearch.client</groupId>
<artifactId>elasticsearch-rest-high-level-client</artifactId>
<version>7.12.1</version>
</dependency>

2.因为SpringBoot默认的ES版本是7.6.2,所以我们需要覆盖默认的ES版本:

3.初始化RestHighLevelClient:

1
2
3
return new RestHighLevelClient(RestClient.builder(
HttpHost.create("http://192.168.150.101:9200")
));

RestAPI实现自动补全 & 案例实现(搜索框输入进行自动补全)

一、RestAPI实现自动补全查询(代码讲解)

代码:

1
2
3
4
5
6
7
8
9
10
11
12
13
14
15
16
17
18
19
20
21
22
23
24
25
26
27
28
29
30
31
32
33
    @Autowired
private RestHighLevelClient client;


@Test
void testSuggestion() throws IOException {
//1.准备Request
SearchRequest request = new SearchRequest("hotel");
//2.准备DSL
request.source().suggest(new SuggestBuilder().addSuggestion(
"suggestions",
SuggestBuilders.completionSuggestion("suggestion")
.prefix("hm")
.skipDuplicates(true)
.size(10)
));
//3.发起请求
SearchResponse response = client.search(request, RequestOptions.DEFAULT);

//4.解析结果
Suggest suggest = response.getSuggest();
//4.1 根据补全查询名称,获取更全的结果
CompletionSuggestion suggestions = suggest.getSuggestion("suggestions");
//4,2 获取options
List<CompletionSuggestion.Entry.Option> options = suggestions.getOptions();
//4.3 遍历
for( CompletionSuggestion.Entry.Option option : options){
String text = option.getText().toString();
System.out.println(text);
}

// System.out.println(response);
}

其中:

@Autowired
private RestHighLevelClient client;

要在项目启动方法里面注入到bean里

二、以下进行黑马旅游网的案例实现自动补全功能:

开始时,输入x,不能自动补全

RestAPI实现自动补全:

(1)在controller层写好接口

1
2
3
4
@GetMapping("suggestion")
public List<String> getSuggestions(@RequestParam("key") String predix){
return hotelService.getSuggestions(predix);
}

(2)在service层写好

1
2
3
4
5
6
7
8
9
10
11
12
13
14
15
16
17
18
19
20
21
22
23
24
25
26
27
28
29
30
31
32
33
34
@Override
public List<String> getSuggestions(String predix) {
try {
//1.准备Request
SearchRequest request = new SearchRequest("hotel");
//2.准备DSL
request.source().suggest(new SuggestBuilder().addSuggestion(
"suggestions",
SuggestBuilders.completionSuggestion("suggestion")
.prefix(predix)
.skipDuplicates(true)
.size(10)
));
//3.发起请求
SearchResponse response = client.search(request, RequestOptions.DEFAULT);

//4.解析结果
Suggest suggest = response.getSuggest();
//4.1 根据补全查询名称,获取更全的结果
CompletionSuggestion suggestions = suggest.getSuggestion("suggestions");
//4,2 获取options
List<CompletionSuggestion.Entry.Option> options = suggestions.getOptions();
//4.3 遍历
List<String> list = new ArrayList<String>(options.size());
for( CompletionSuggestion.Entry.Option option : options){
String text = option.getText().toString();
System.out.println(text);
list.add(text);
}
return list;
} catch (IOException e) {
throw new RuntimeException();
}
}

(3)重新启动项目

便可以进行自动补全了

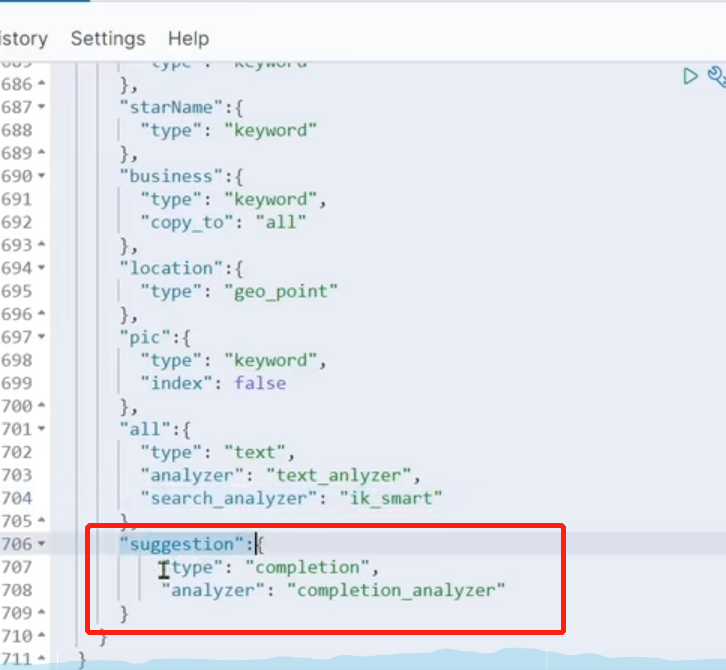
设置索引库结构,给用户添加可自动补全的suggestion,并将一些字段变成集合放到suggestion里面去

设置索引库结构,给用户添加可自动补全的suggestion,并将一些字段变成集合放到suggestion里面去

image-20230313225514389

若business有多个sss值,可进行切割

进行切割

1
2
3
4
5
6
7
8
9
//将brand 和 business 变成集合放到suggestion里
if(this.business.contains("/")){
//business有多个值,需要切割
String[] arr = this.business.split("/");
//添加元素
this.suggestion = new ArrayList<String>();
Collections.addAll(this.suggestion,arr);
}else
this.suggestion = Arrays.asList(this.brand,this.business);

切割成功